¶ Importing a Map
¶ Layers
¶ What is a layer?
Layers in Codex correspond roughly to ‘stories’ or ‘floors’ in real life- when you walk up a set of stairs, you expect to end up at the next floor above your head.
You can make this happen almost exactly as you'd expect in Codex, not just with stairs, but ladders, hatches, and even create some nasty surprises for your Shadow who just won't stop sneaking off by themselves.
If you've ever used a piece of art software, such as Photoshop or Clip Studio, you're already a solid 75% of the way there as the layers in Codex function almost identically. Each layer is functionally a place to store separated map details.
Assume the ground is always there- for the most part, we don't want things we put on top of it to actually change anything underneath. We want to move that chair around without it literally tearing up the grass - to combat this, we can put the chair on a new layer above our grass, allowing the 2 to co-exist in harmony.
Layering things like grass, floorboards, chairs, tables, cups, and so on is how we build up real 3D detail into the world. Trees you can walk under and bridges you can walk over. Items you can pick up and boulders that block your path.
| PICTURE OF UI HERE SOON | 1. Visibility Toggle | Hides the layer for the director only - this does NOT hide the layer for your players! |
| 2. Layer Lock | Prevents the layer from being edited or changed in any way. | |
| 3. Sub-layer Folder | Stores all sub-layers related to a given primary layer. | |
| 4. Layer Name | Changes the name of the primary layer. | |
| 5. Layer Transparency | Lowers or raises the opacity of the primary layer for the director only. This does NOT change the opacity for your players! | |
| 6. Layer Height | Changes the amount of squares up from 0 the layer is. By default, your main layer will be 1 square high. | |
| 7. Players on Layer | Shows which layer, and sub-layer any character tokens are on. | |
| 8. Layer Settings | Allows for more advanced modifications of your layer, including making it a roof layer. | |
| 9. Primary Layer | The main layer, comprised of all of the sub-layers squashed together. | |
| 10. Sub-layer | The ‘innards’ of the main layer, so to speak, where the content is actually stored. |
¶ Layer Types
¶ Primary Layer
A primary layer by default lets you use the layer as a canvas- you can paint things on, add objects, and all of it will interact. Want to draw a lake on your map? You can do so on your primary layer! However, that's not all it is. A primary layer is also, functionally, a folder for your sub-layers which make up the primary layer they are stored in.
¶ Sub-Layer
A sub-layer is all the little layers inside of a primary layer. They function like different elements in those 3D paper cards. On the bottom layer, anything you want to show underneath the rest, then a layer above that for the first layer of detail and so on. It is a microcosm of how primary layers function, with the added benefit of not affecting the ordering of the other layers. This means you can draw a pit and make it visibly dark when looking down into it, but completely lit when you actually fall down into it (see the gif above for reference to this effect).
¶ Roof Layer
A roof layer is a layer that is able to change opacity when players walk underneath it. Most TTRPG maps are drawn with the idea of being able to see inside of buildings by default, but sometimes you want the ability to hide what's going on so you can describe it without your players able to see all the action instantly. A roof layer, then, can provide temporary cover while your players scheme, before revealing the demon summoning inside once your intrepid heroes finally decide to walk in.
¶ Using Layers

By default, when you load into a new game for the first time you will have 1 primary layer named ‘Main Floor’ that will be above the ‘Ground’ line. This is important to note when arranging your layers, as anything below the ‘Ground’ will be considered a ‘Basement’ or ‘Cave’ layer, and be subject to different lighting to mimic the conditions of being…well…under the ground!
Note that a layer does not need to be underground for you to have an indoor map- buildings can be drawn onto the map to mimic these conditions instead, as outlined in the Floor/Walls Tool section of this article.
Layers are ordered from top to bottom as front to back - think of the top most layer as the very last thing you would add to a painting, and the bottom most layer as the very first coat of paint. You can re-arrange these layers at any time by dragging and dropping to move things around, so you can experiment with trying to get things where you want them to be.
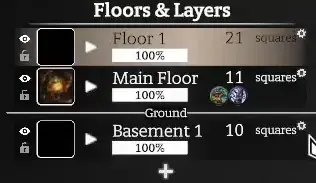
Sub-layers function almost identically to primary layers within themselves, so you can re-order sub-layers just like primary layers. You cannot move a sub-layer to a different primary layer nor can you set a sub-layer to be a roof layer, only a primary layer may be changed in this way.
As shown, when you re-order a layer, the number of squares will update automatically to be more, or less, than the layer above or below it. Make sure to check this when you re-order as you might end up going from a 2 square drop to a 20 square one if the numbers hash out a bit strangely.
It should be noted that Sub-layers should only be used for detailing. Any monsters, characters, or interactables should be placed on your ‘main’ sub-layer, or with the sub-layers tab closed and simply added to your Primary layer. This is because sub-layers cannot interact with each other, so your players will not be able to pick up that book on the table if it's not on the same sub-layer.
Lastly, we have the Roof layer. You can turn a primary layer into a roof layer by clicking on the settings cog on the right-hand side of a given layer. It will take you to a parallax view where you can select the layer you would like to edit on the right-hand side.
Once selected, you will see the menu pictured here below. Our options are as follows;
 |
1. Roof | Switches the Layer to a Roof Layer |
| 2. Hide Roof.. | Sets the layer to 0 opacity when players are underneath it | |
| 3. Vision Multiplier | Sets how far a player can see when underneath the Roof Layer | |
| 4. Cutaway Radius | Sets how far the player can see unimpeded before the Roof Layer image will obscure their view. | |
| 5. Cutaway Fade | How smooth the cut from vision to no vision is at the Cutaway Radius' edge. | |
| 6. Minimum Opacity | How much the Roof Layer should be visible at all times, even when players are underneath. Useful for Tree Canopy-like effects. |
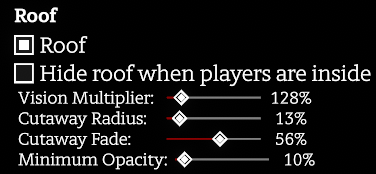
If you're not sure where to start with messing around with the options, you can try these settings for a thick tree canopy:
Your roof layer will only ‘work’ in the areas where something has been drawn on it. If you draw some trees on the roof layer, and none on a layer below, the trees will fade but there will be a clear floor below. If you draw some trees on your primary layer, but no trees on the roof layer, then the trees will not fade at all.
A good balance between what's always visible and what fades is the key to getting the effect just right.
¶ Terrain Tool
¶ What is Terrain?
Terrain is under our feet in the natural world - the rocky beach sand, the flowery meadow grass, the water in a deep lake and, sometimes, the metal flooring of a flying city. Your difficult terrain effects will be stored here, and it can dictate a liquid your players must swim through instead of being able to simply walk.
Typically, you're going to be painting this on to any given custom map first to set the scene, before you start to build up houses, or castles, or dungeons.
¶ Terrain Editor

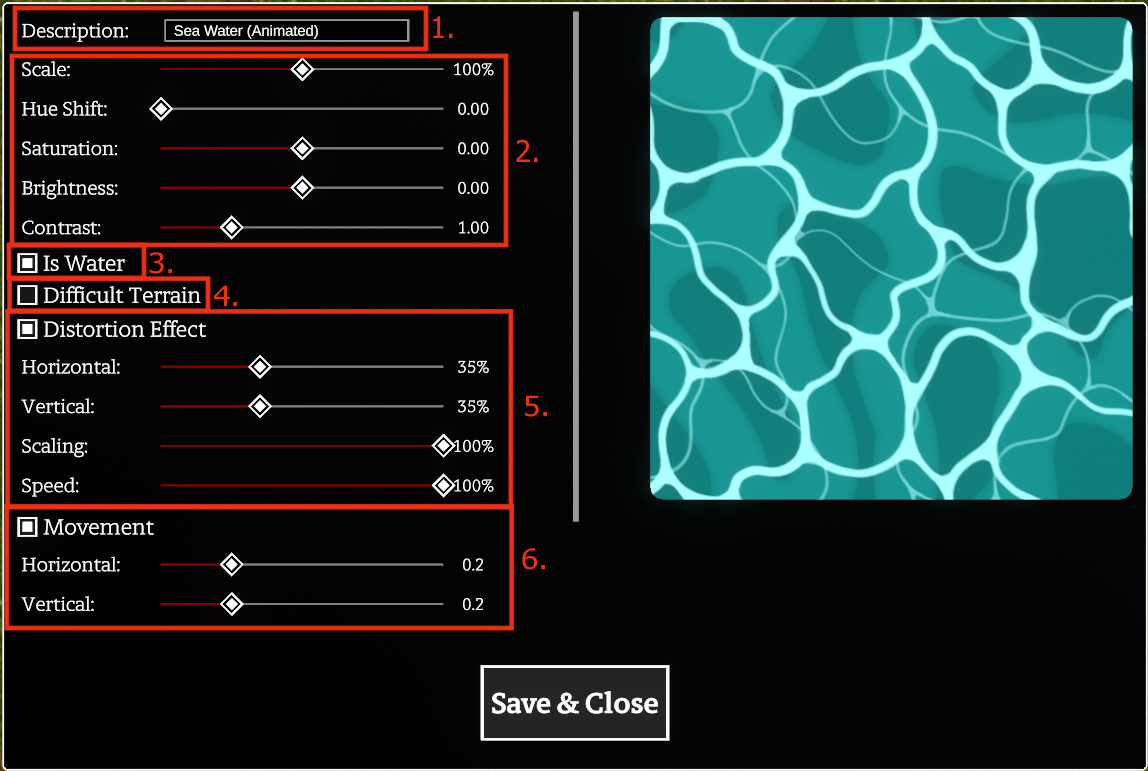 |
1. Description | Name given to your tile - what you will see on hover, make sure similar looking tiles have distinct names! |
| 2. Tile Edit Options | Options to edit the basic attributes of the tile. Scale changes the image size (not the tile size), Hue shift and Saturation changes the colour, Brightness and contrast change how bright and varied the tile is. | |
| 3. Is Water | Changes the tile attributes to invoke ‘while swimming’ rules when a character is on it. | |
| 4. Difficult Terrain | Changes the tile attributes to difficult terrain, slowing characters on top of it. | |
| 5. Distortion Effect Options | Options to render an animation with the tile, specifically distorting it in various ways. Useful for things like weird fog or acid. | |
| 6. Movement Options | Renders an animation on the tile as if it was moving, or flowing. Useful for things like flowing rivers or lava pits. |
By default, Codex comes equipped with a plethora of terrain-types to support lots of basic map making, including various grasses, paving types, rock, sand, water, and more. They are already setup to be difficult terrain, or water, which can be viewed by hovering each terrain in the panel. You can get a lot of mileage out of right click > Duplicating and then editing a tilesheet into something a bit new before trying to upload terrain of your own, as it can be a great creative challenge!
¶ Tools of the terrain
| 1. Tool Selection |
The tools that can be used with terrain. From left to right; Rectangle Tool - Allows you to draw rectangle shapes. Circle Tool - Allows you to draw circle shapes, with your mouse being the center point. Free Polygon Tool - Allows you to draw straight lines to create a custom shape that will fill upon closing. Curves Tool - click for a straight line, click and drag to curve the line. Lines after the initial will curve towards your mouse. Free Draw Tool - Lets you draw freely to enclose a shape to fill. Brush Tool - An art-like brush for painting with the tiles like textures. Eyedropper Tool - Lets you select an already placed terrain tile to re-pick it. |
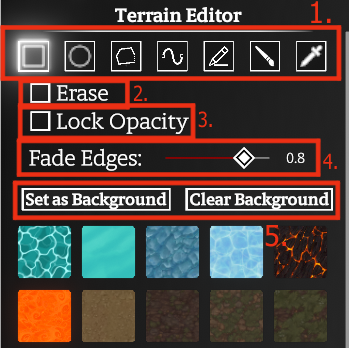 |
| 2. Erase | Turns your selected tool into an eraser that functions identically to your tool. | |
| 3. Lock Opacity | ONLY APPLIES TO BRUSH TOOL - Only allows you to paint on top of already placed terrain. Does not allow painting on the background/void. | |
| 4. Fade Edges | Lowers the opacity of your terrain tile near the edge. The slider dictates how transparent the tile gets. | |
| 5. Background Options |
‘Set as Background’ - Fills in the ‘void’ background with your selected terrain tile ‘Clear Background’ erases the background back to the black ‘void’ default. This will not clear any hand-placed terrain. |
 |
1. Brushes | List of all of your personal brushes. By default 4 should be present; 2 textured brushes, 2 untextured brushes. |
| 2. Add Brush | Adds a new, white round circle brush for you to edit. | |
| 3. Active Brush Settings | Shows any settings set as ‘active’ or ‘visible’ for your selected brush. |
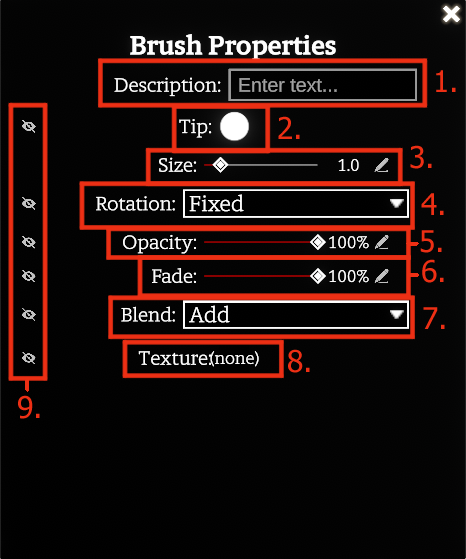
| 1. Description | An internal description of the brush. Will not show on hover, only when the brush properties are open. |
|
| 2. Brush Tip | What shape your terrain will be painted on it- the ‘tip’ of the ‘brush’ you use to ‘paint’ your terrain. | |
| 3. Brush Size | The size of the brush. visible when you hover over your map. | |
| 4. Brush Tip Rotation | Doesn't affect Terrain tiles - allows the rotation of a tile to match a brush stroke to create more ‘randomness’ or ‘chaos’ within a pattern. | |
| 5. Brush Opacity | The opacity of the brush. Interacts with the blend option. | |
| 6. Brush Fade | Controls the brush fading around the edges. Higher percent moves the fade closer to the center of the brush, making it a softer brush. 100% is a hard round circle. | |
| 7. Brush Blend |
How a less than 100% opacity brush will blend into itself. Add - Like paint, will add another ‘layer' of the texture. Max - Paints the same opacity even on top of itself. |
|
| 8. Brush Texture | Adds a texture to the brush to emulate the surface you are painting on. For example, a paper texture makes it look painted onto a real piece of paper. | |
| 9. Visibility | The visibility of the settings on the brush sub menu. Shows or hides a given option to be adjusted on the fly. |
Using the brush can take a bit of work to get used to, but once you do you'll find you open new avenues to create maps!
¶ Scene Painting
You've got your grand campaign idea, your players are excited, but now you're staring at a black square and need to make it into a sick new map. Don't panic!
¶ Floor/Walls Tool
¶ Elevation Tool