¶ The Basics
¶ Join or Host a Game
Once you have logged in, click Play and you will be presented with a screen with a list of your games. For new users, you will only have a New Game option. Clicking this will present you with a Join/Host game window.
To join an existing game, enter the Invite Code into the box highlighted in the image below. Your Director can give you this code. Once you have entered the Code, you will need to press Join Game.
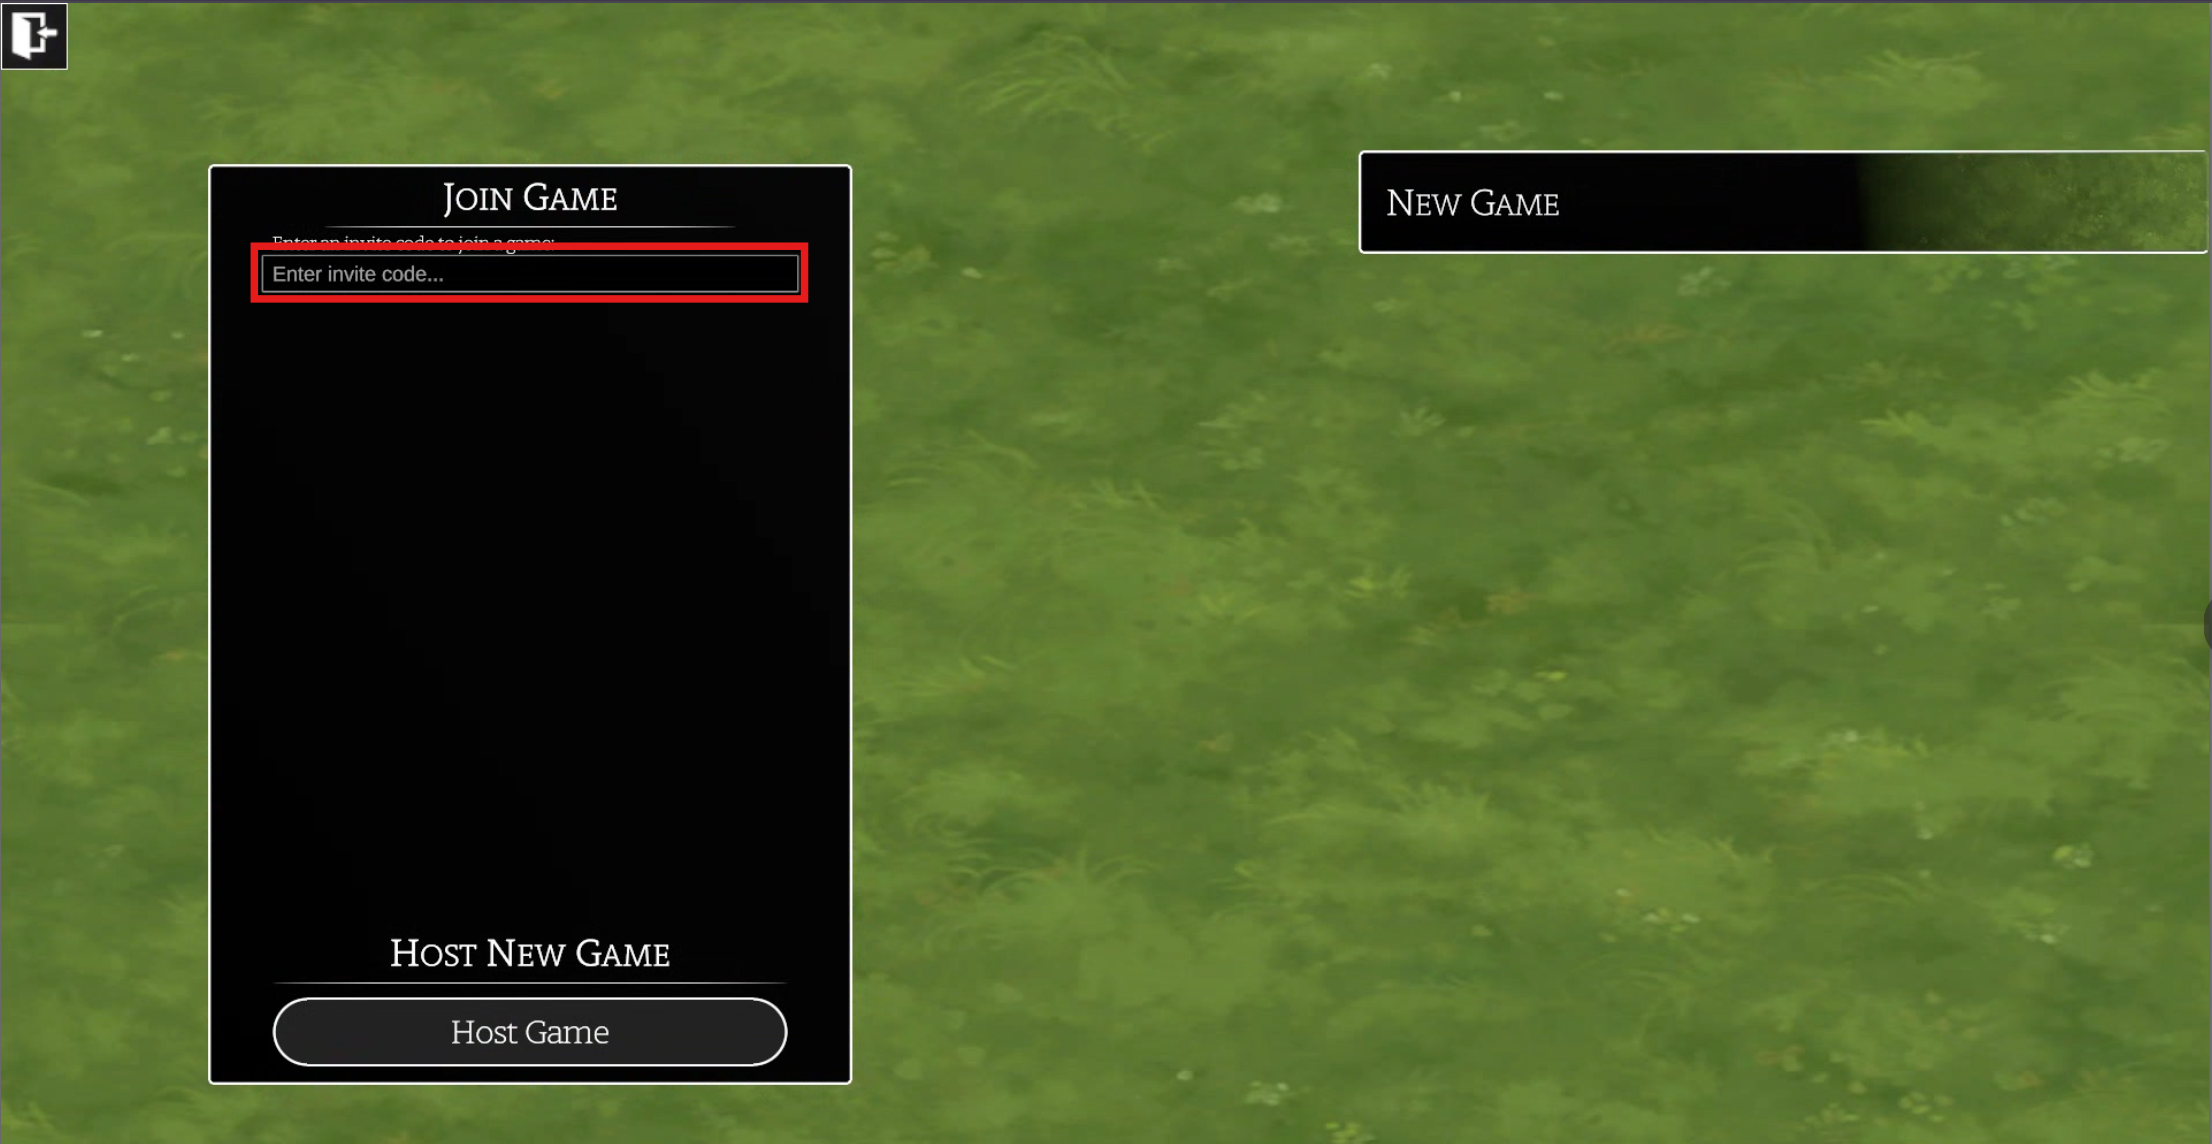
To start a new game with yourself as the Director, click Host Game. Your game will be created. Here you can enter the game by clicking the Play button or edit your game settings by clicking the Settings button.
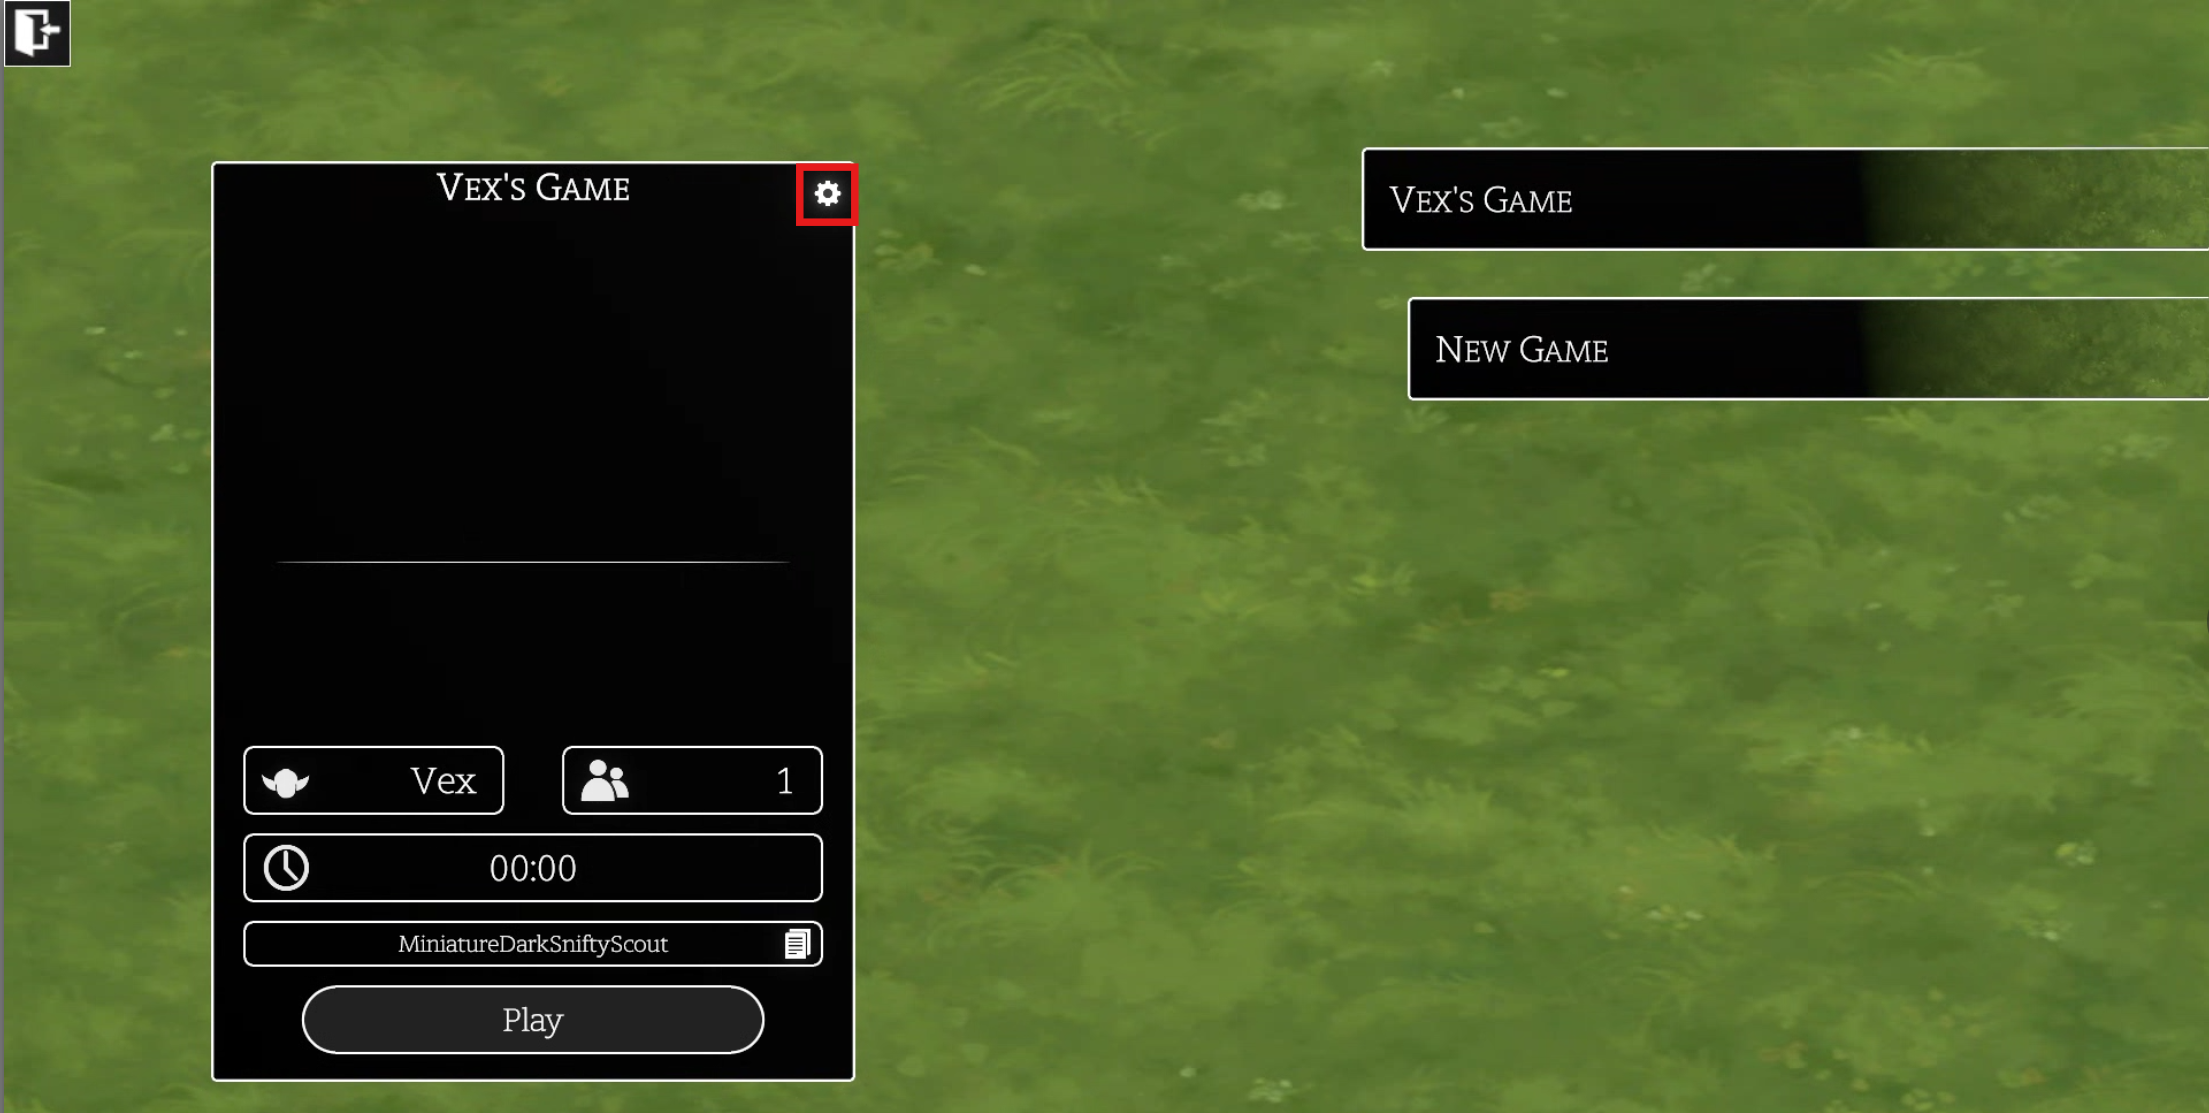
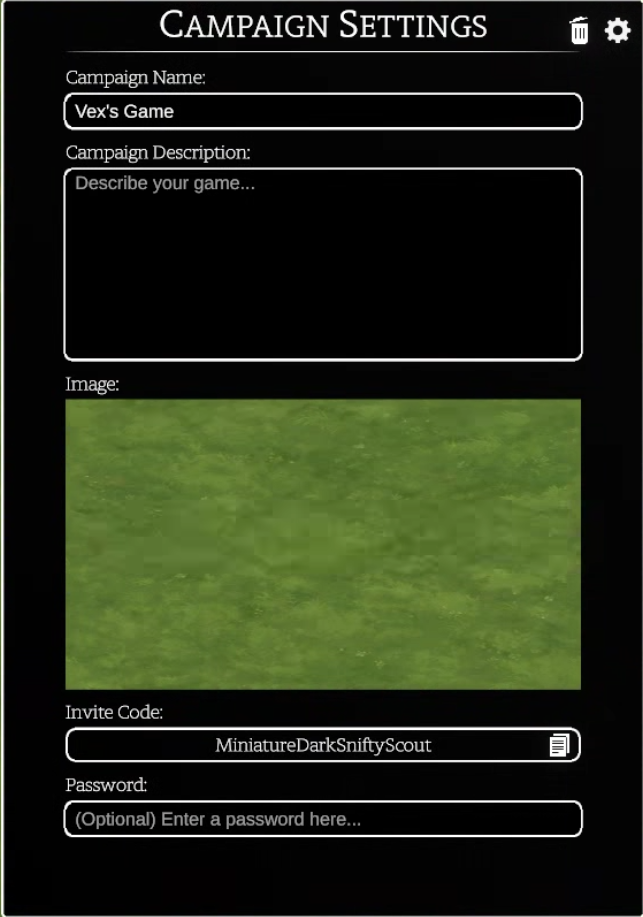
Inside the Campaign Settings, you can change your game name, add a description and change the background Image that will show for yourself and your players when you are loading into the game.
Please take note of the Invite Code here which is what your players will need to enter when they are joining your game. We also provide the option to apply a password to the campaign so that your players must enter the Invite Code and a Password to join. You can return to the previous screen by clicking the Settings button again.
Players
Once you have joined the game, you will only see a black screen until your director either assigns a Token to your user or to the Players group.
Creating Tokens
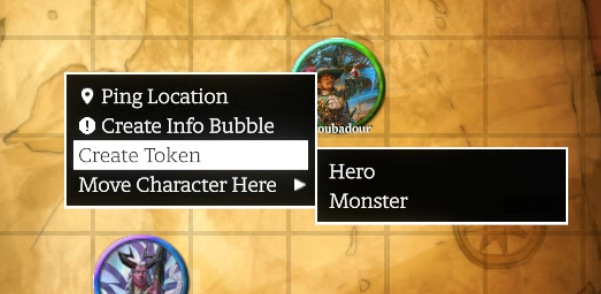
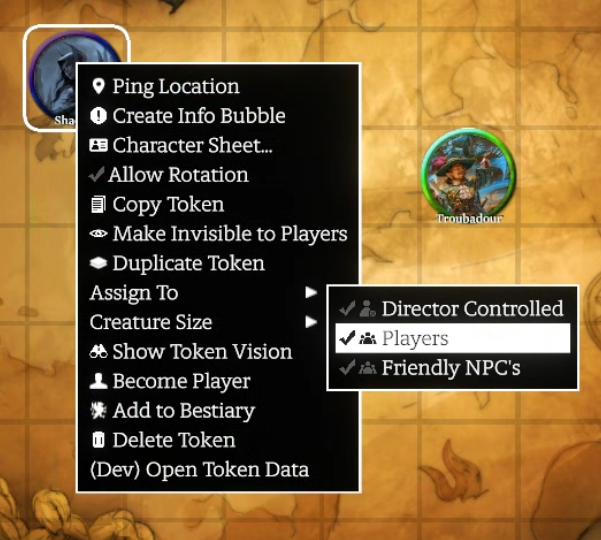
It is good practice when creating a game to place a Hero Token for each of your players on the map by right-clicking on the canvas, hovering over Create Token and selecting Hero.
Assigning Tokens to Players
You can then right-click on the token, hover over Assign to and select Players so when you invite someone to your game, they see the map instead of a black screen. Once players have joined your game, their username will be in this list and you should assign a token to them directly rather than the Player Group as a whole.
¶ Building a Character
To build your character, you need to select your token and either right-click and select Character Sheet or press ‘C’ on your keyboard. This will bring up the Character Sheet.
Please note that this sheet is NOT final and is a first pass at a functional sheet for Draw Steel. This will receive further revision and a UI pass.
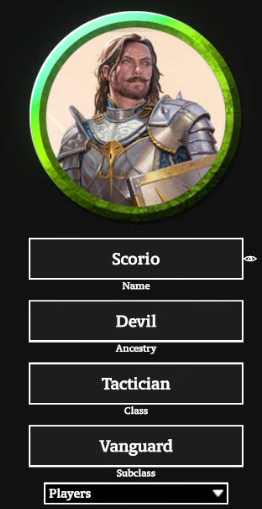
Name
To set your name, click on the text field beneath your token appearance, type in your name and then press Enter or click on another place on the screen to save it.
Select Builder tab at the top of the screen which will present you with sub-tabs for Ancestry, Culture, Career & Class. Clicking on these will take you into the relevant screen to make a selection.
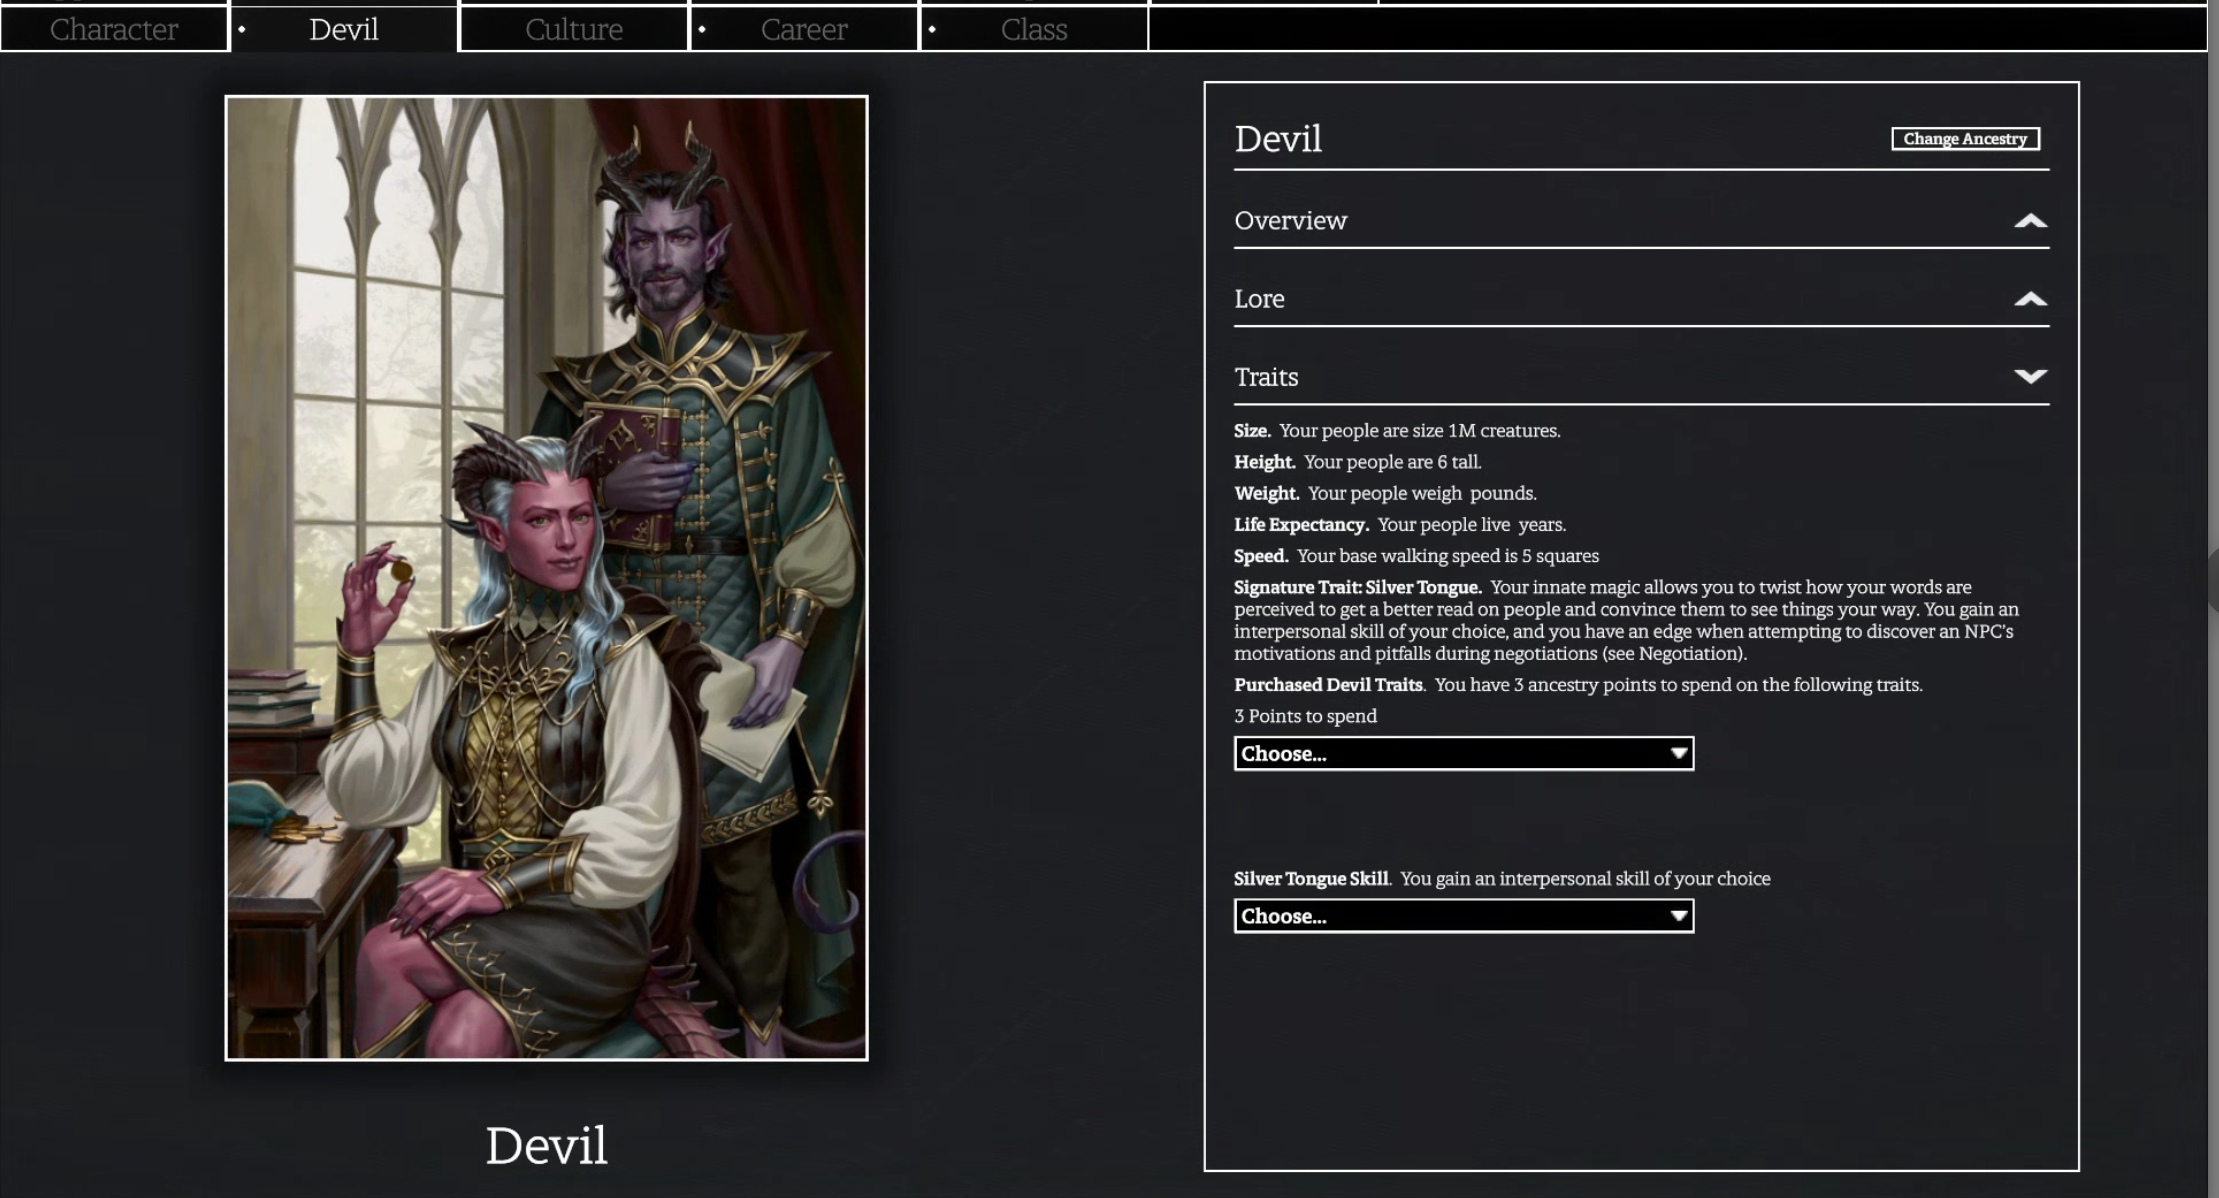
Ancestry
This is a carousel view, click the arrows down the bottom of the screen to cycle through the ancestries and click Select to lock in your selection. You can then use the dropdowns to make your Ancestry selections such as Traits & Skills.
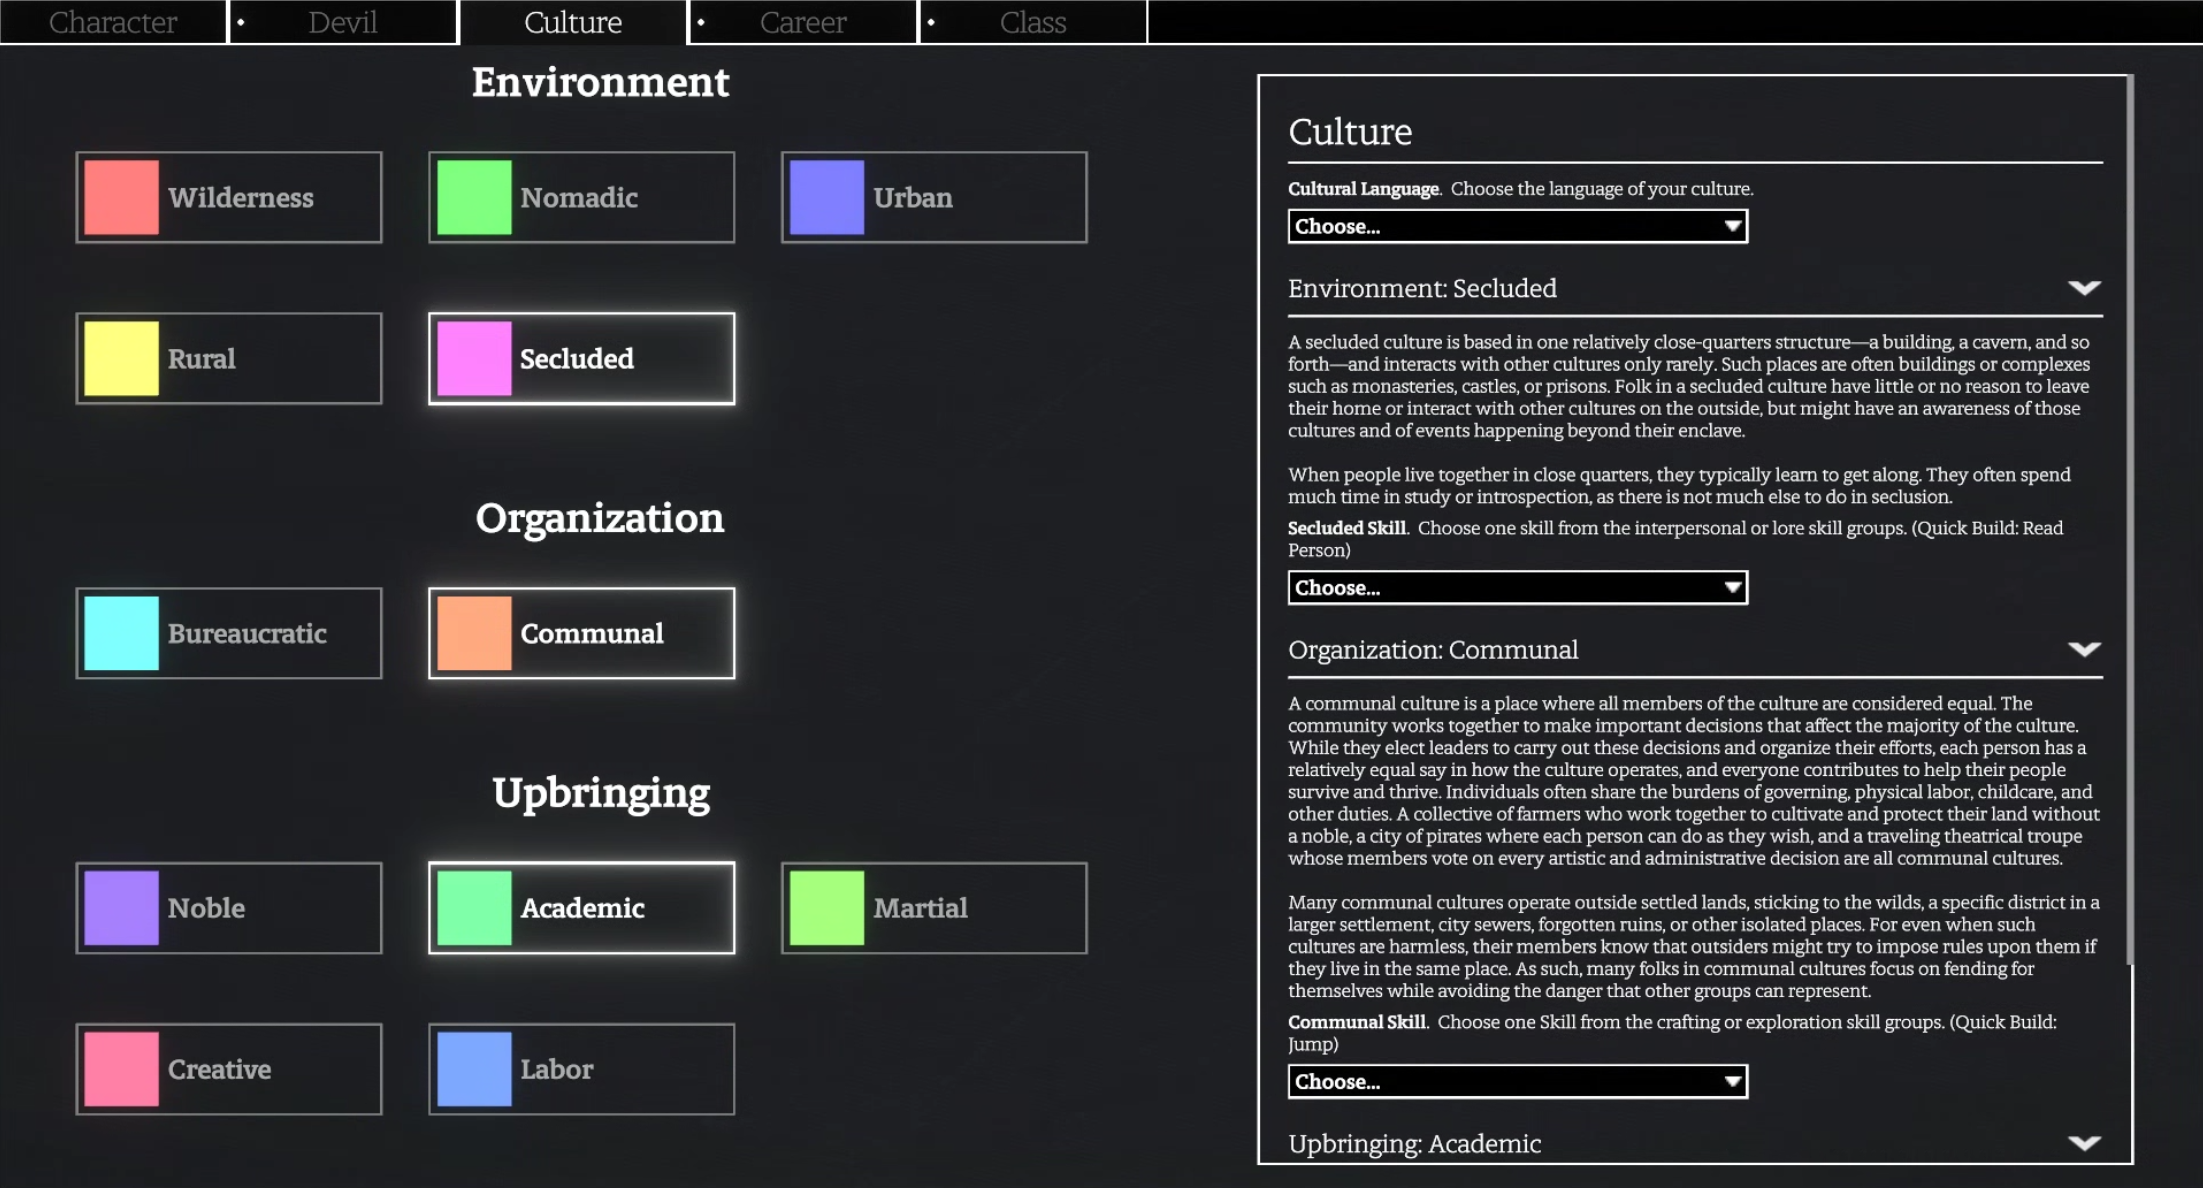
Culture
Select a culture on the left panel, the description and your selection options will be in the right panel. Click the dropdowns to make your selections.
Career
This screen is very similar to the Culture Panel, make a selection on the left panel and the description and choices of Inciting Incident, Skills, Perks, etc are on the right panel.

Class
This screen is a carousel view where you use the arrows at the bottom to cycle through your class options. Once you have reached the class you want, click the Select button to lock in your selection.
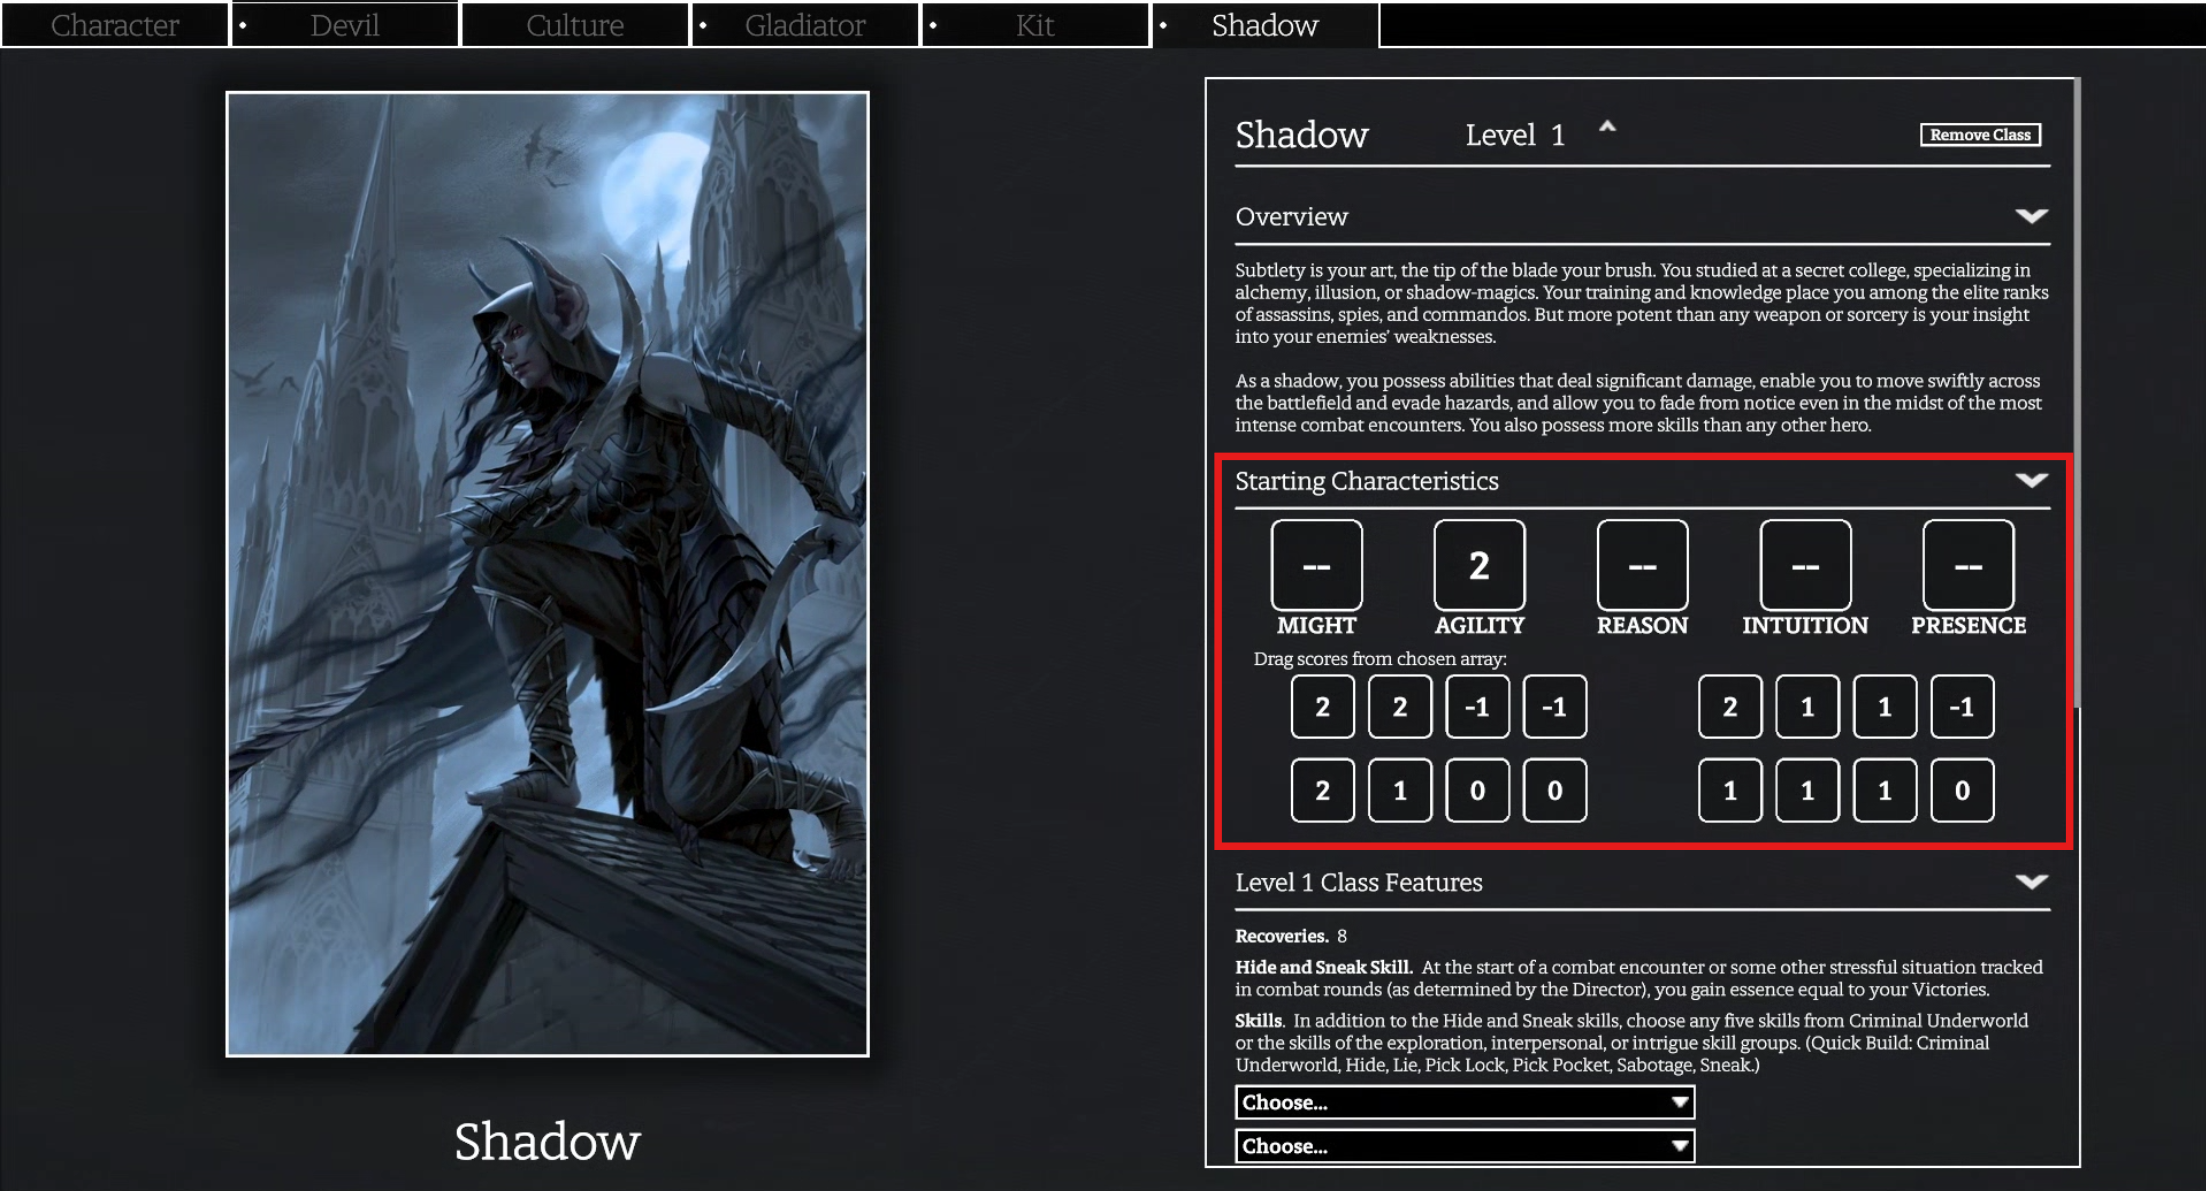
To set your Starting Characteristics, choose one of the available Characteristic arrays and click and drag each number into that array over the corresponding box of the Characteristic you want to assign it to. The Codex has some logic built in to automatically assign remaining numbers in the array once you have made your distribution clear. As an example, in the image below, if you have chosen the 1,1,1,0 array, you could just assign the 0 to a Characteristic and as the remaining numbers are the same, the 1’s will automatically be assigned to the remaining empty Characteristic boxes.
Next to the Class title in the right panel it will display your current level. Clicking the up arrow next to this will increase your level, automatically increase your stamina and populate the right panel with any additional Class Features you gain or can select.
Scrolling down the right panel will reveal drop downs where you can make class related selections such as Subclass, Signature Abilities, Heroic Abilities, Skills, etc.
Kits
The Kit tab is only available once you have made a Class selection that is able to use a Kit. This is another carousel view. Click the arrows beneath the kits to cycle through the available options and click the Select button to apply that choice.
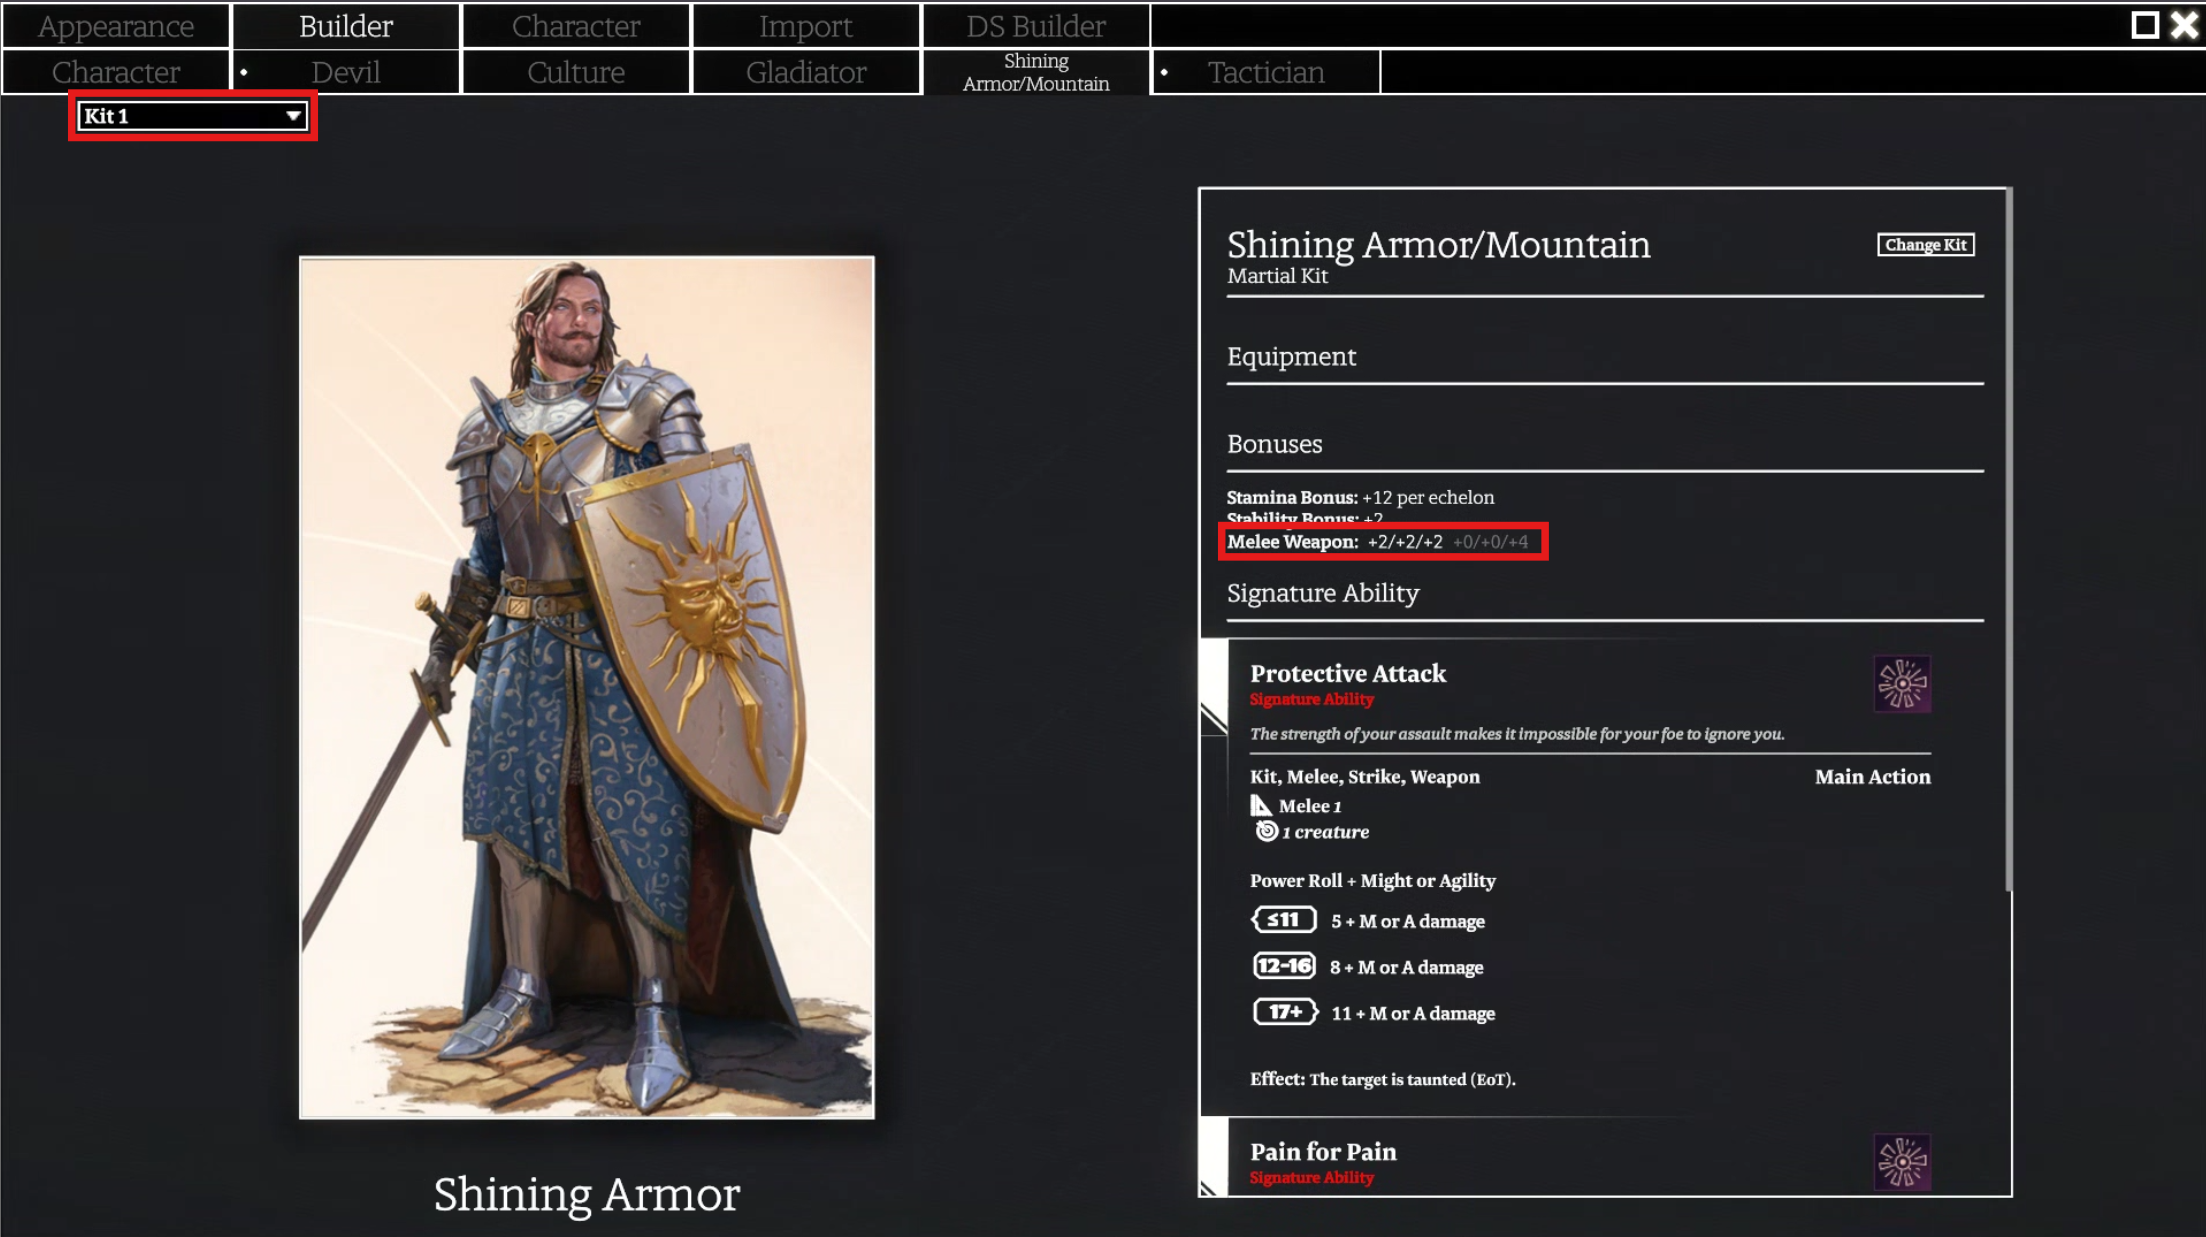
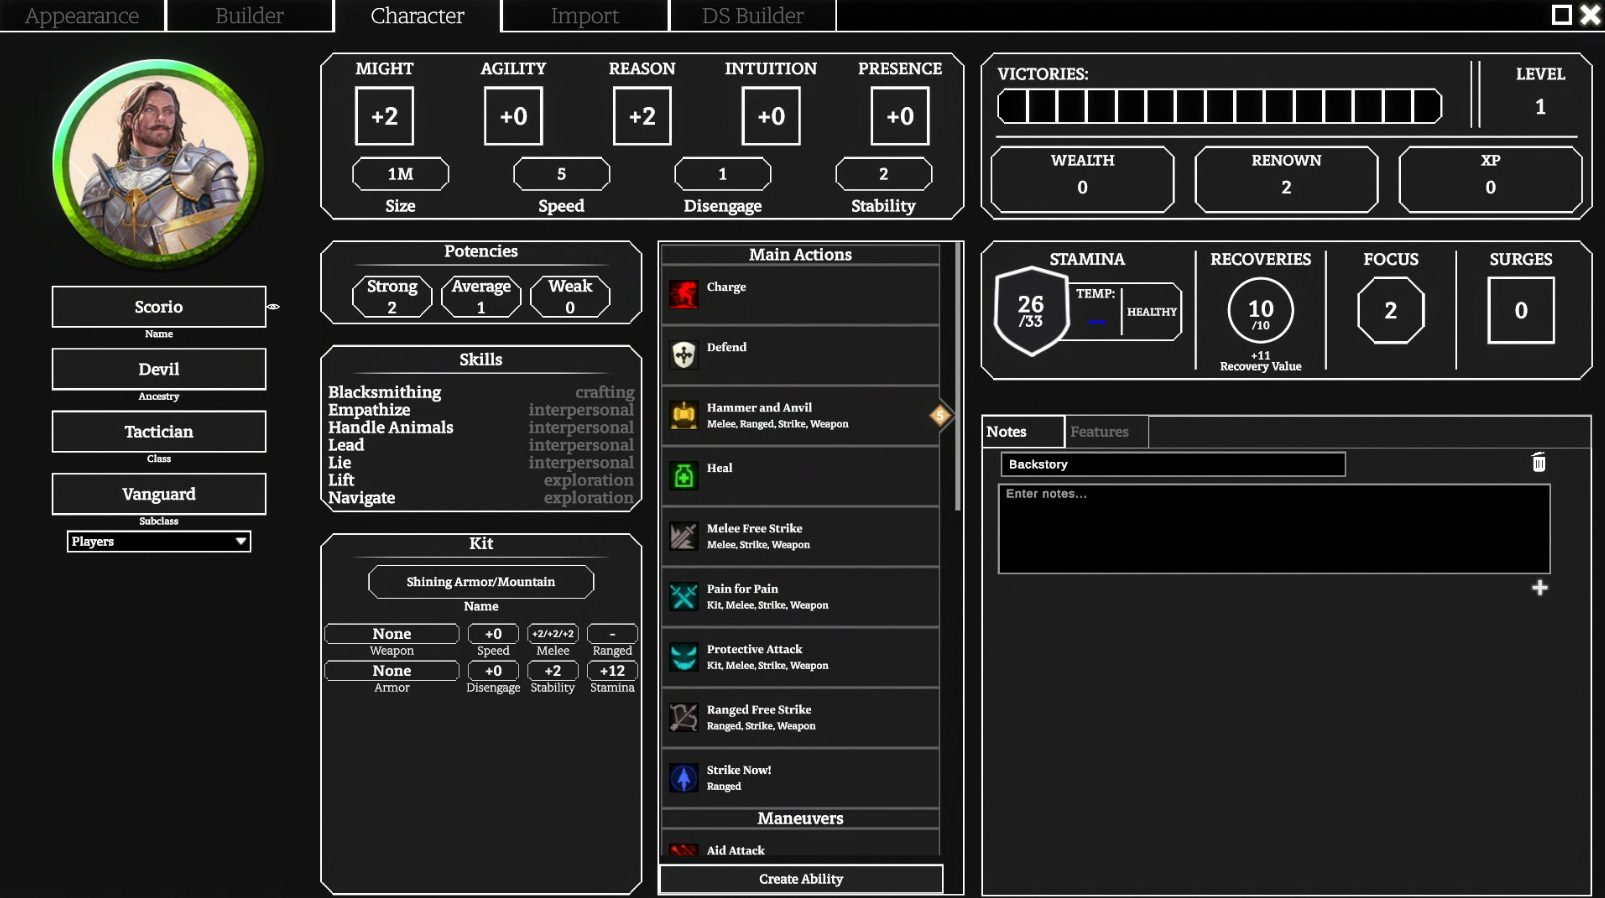
For the Tactician, you can see in the image below that in the top left-hand corner of the Kit screen there is a drop down to change which kit you are making a selection on. Click this dropdown to select Kit 2 and select another Kit. Once you have chosen two kits, where there is a choice between two bonuses such as the Melee Weapon bonuses for the Shining Armor & Mountain kits, you can click on the bonus you wish to have active. This will automatically apply to your abilities where these kit bonuses come into play. This selection option is highlighted for you in the image below.
Token Image & Anthem
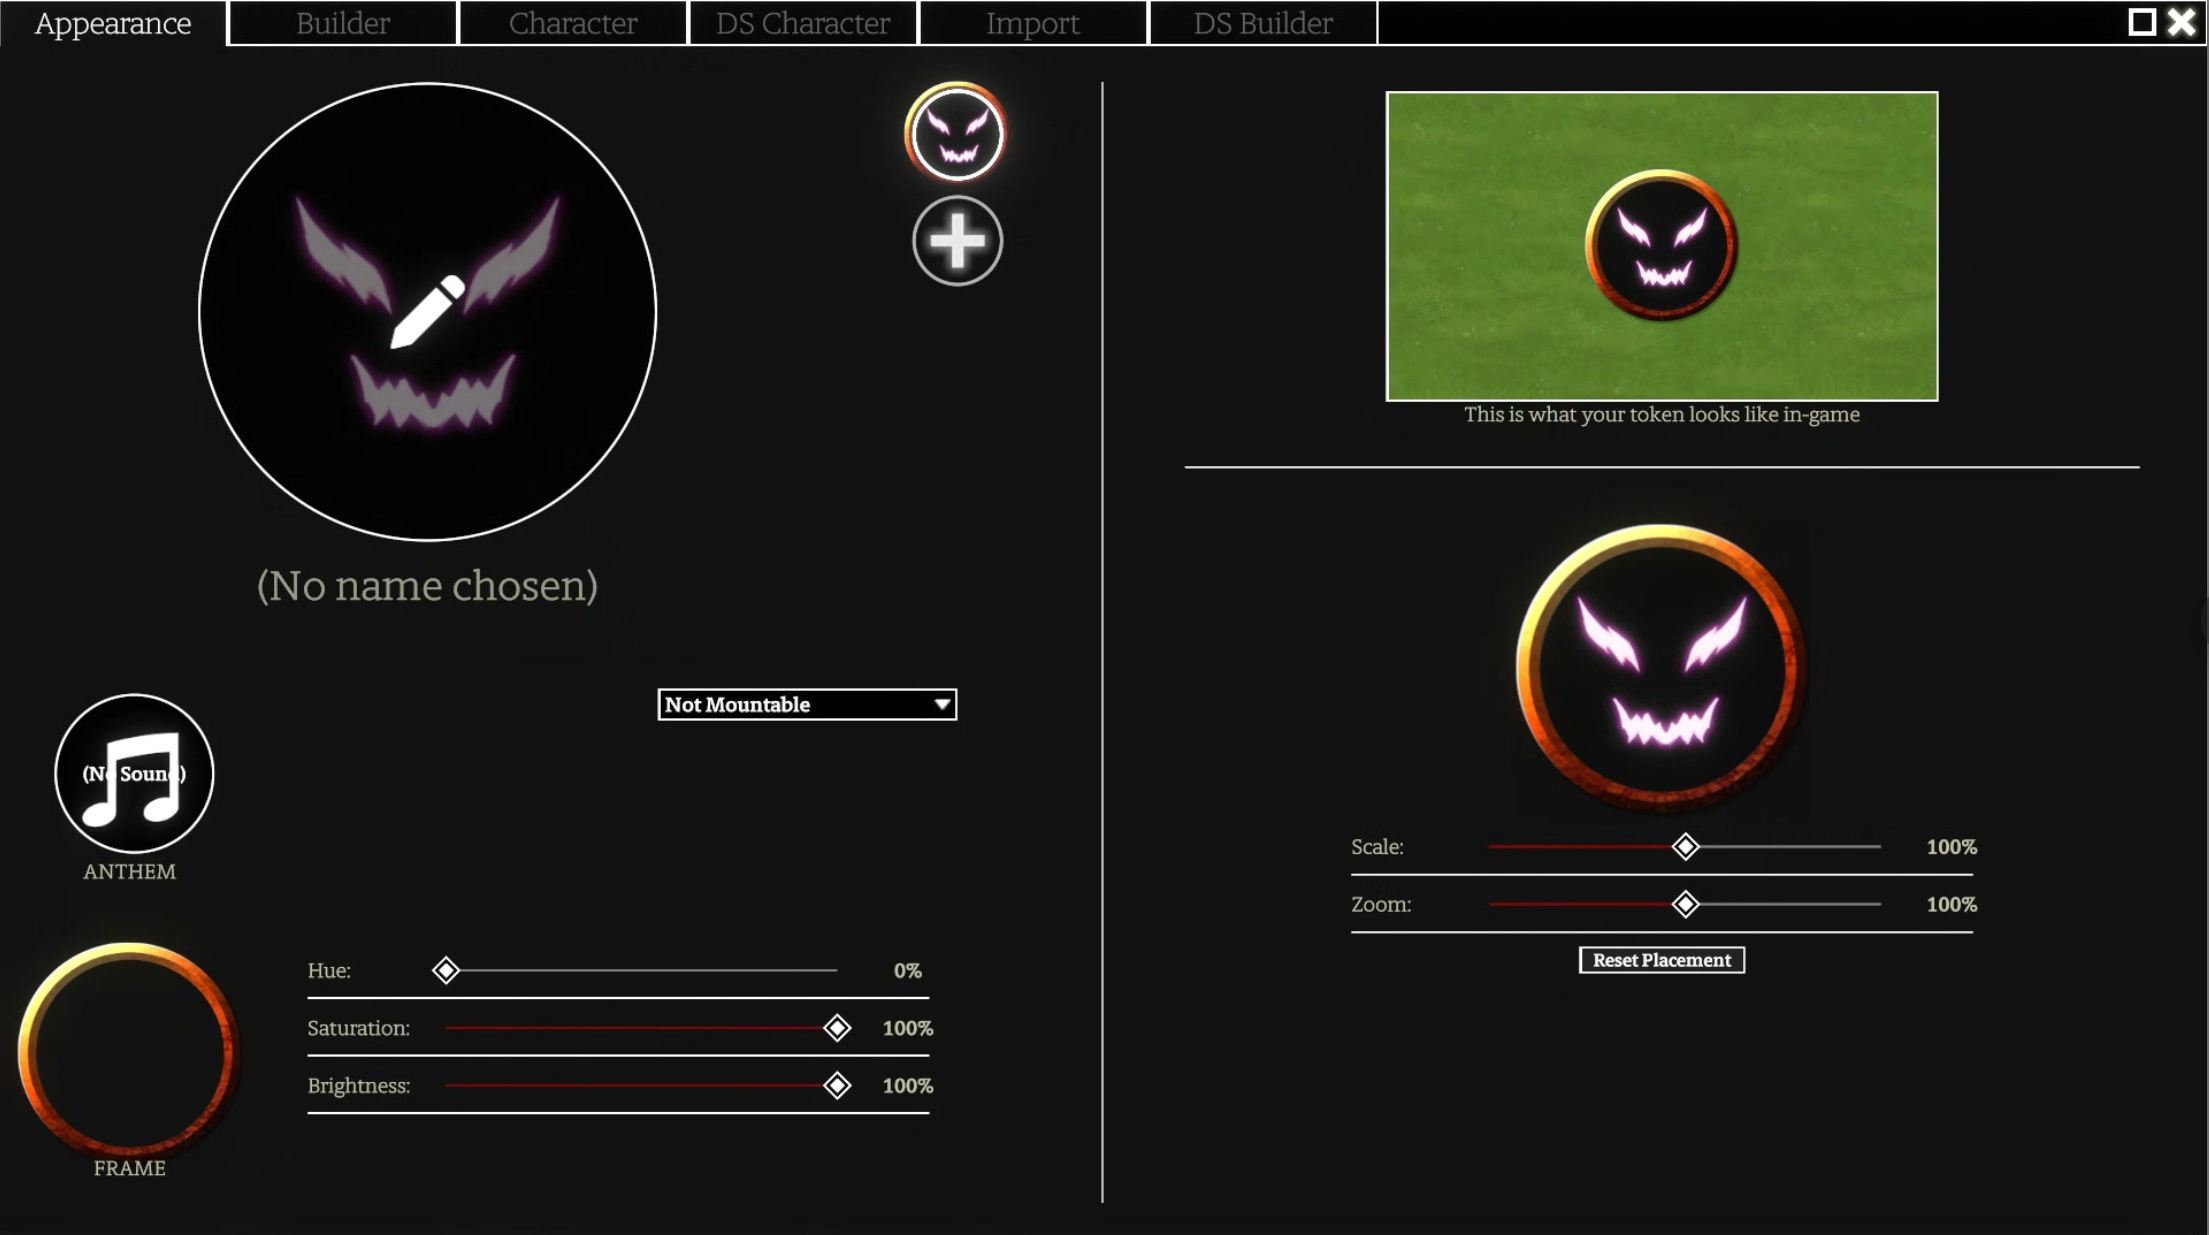
If you want to apply a token image or set an Anthem for your character to herald the start of your turn in Combat, click the Appearance tab which is located to the left of the Builder tab in the Character sheet.
Here you can choose a token image or upload your own, select an anthem, select a token ring and adjust its colours as well as change the Scale, Zoom & positioning of the image on your token.
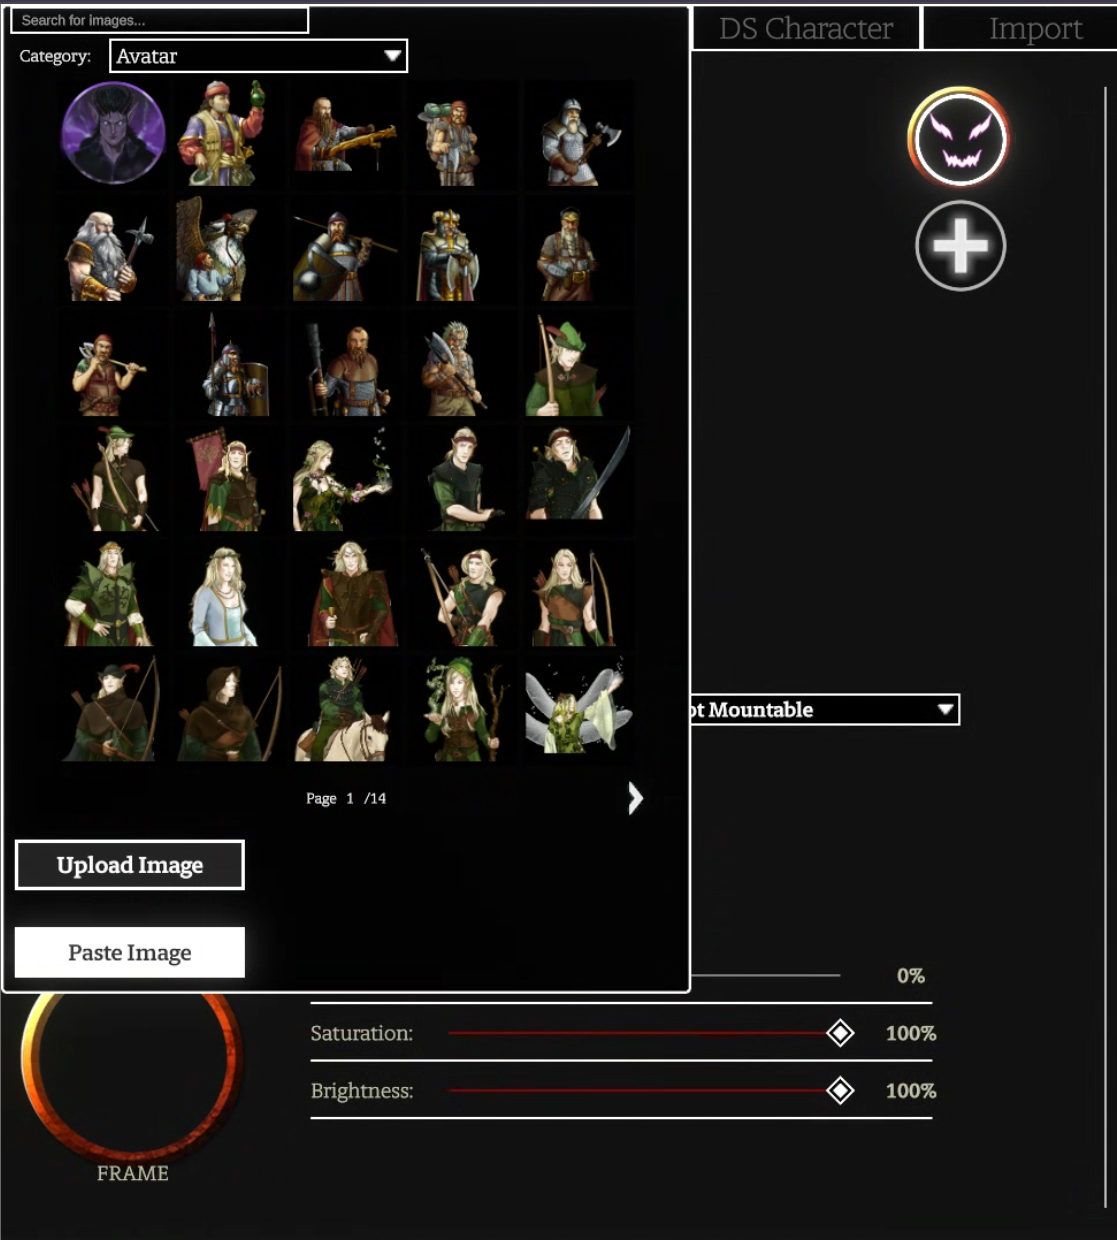
Click the pencil Icon on the Token Image on the left panel to Edit the image. You can navigate the pages to select an image already shipped with the Codex or choose an image that your Director has uploaded to this game. You can also Upload Image which will open a window where you can browse your computer’s filesystem for where you have stored an image. Alternatively, if you have made a selection of an image using something like Windows Snipping Tool, you can click Paste Image and it will upload the image selection stored in your Clipboard by the image selection tool.
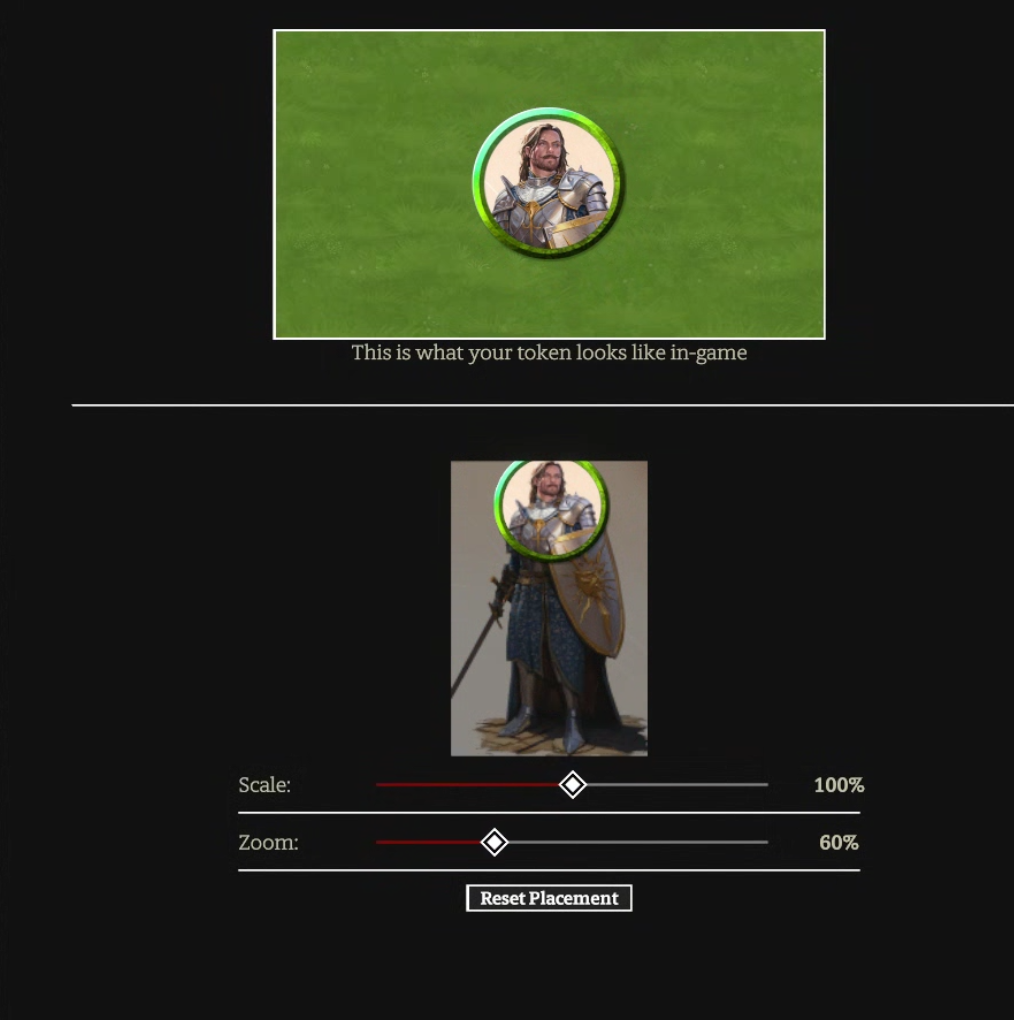
Once you have chosen your image, you use a combination of the Frame & Colour tools on the left panel and the token tools on the right panel to customise your token appearance. Clicking on the Token Frame image will bring up a selection panel to choose one of the Token Frame’s that come with the Codex or you can upload your own. The Hue, Saturation & Brightness sliders will make changes to the appearance of the Token ring.
The right panel gives you a preview of what the token will look like on the map. Below that, you will see your chosen image with a token icon over it. Click and drag the token icon to choose what part of the image is displayed in the token. You can also use the Zoom slider to increase the image size and the Scale slider will increase the overall size of the token on the map.
Anthem
Click the Anthem icon to bring up a screen where you can select one of the default sounds that come with the Codex, a custom sound that has previously been uploaded or Upload your own. There is a play button to preview the sound, clicking on the title of the track will make the selection. Beneath the Anthem icon is a volume slider to control the volume of your Anthem for every user in the game. The default length the Anthem will play is 10 seconds, this can be configured by the Director in the Audio tab in Settings.

Once your character has been built, simply press the X in the top right-hand corner to return to the map. You will notice that your Action Bar will now have your selected abilities and triggers available in the relevant drawers.
¶ Character Sheet
The Character Sheet is a new addition to the Codex and is a first pass at a functional sheet for Draw Steel. This will be reviewed and a UI pass is planned to make it easier to use and look nice.
The Character Panel & Action Bar are how you will mainly interact with your character during play and the Character Sheet provides you a more in-depth view of your character. Here you can manage things that you don’t touch as often such as Wealth, Renown, XP, Character Notes & adding Abilities/Features. You can also make edits to your existing attributes such as Characteristics, Size, Speed, Disengage, Stability, Recoveries, Stamina, etc.
Our lead developer Denivarius has put together a short video demonstrating this Character Sheet. I highly recommend watching this to understand the functionality and what you can do.
¶ Character Panel & Action Bar
Character Panel
The Character Panel is used for Heroes and Monsters. Some features are common across both and some are unique to Heroes. These features are numbered below with a short description. The number corresponds to the below image which highlights where this feature can be found.
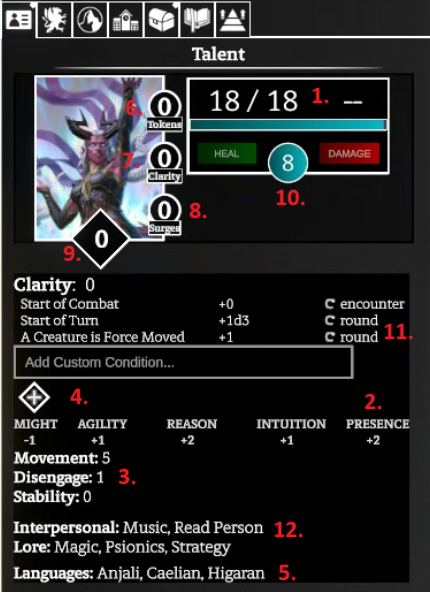
1. Stamina - This shows current and maximum stamina. The -- next to Stamina is where Temporary Stamina can be set. A lot of the damage and healing related abilities/features in the Codex are automated. This doesn’t cover every scenario so the Heal & Damage boxes below the Stamina bar can adjust these manually. Type a number in the Heal or Damage box and press enter to apply to the token. |
| 2. Characteristics - Clicking on a Characteristic will bring up a Power Roll dialog box where you can make a Test. The Skilled checkbox in this window adds a +2 to the roll. |
| 3. Movement, Stability, Disengage Bonus - Reference fields only |
| 4. Active Conditions/Add Condition menu - Active conditions will show here, as long as the duration they will be active (Save Ends, EoT, EoE). The + symbol can be clicked the add a condition from the list manually and apply the relevant duration. The Custom Condition text field can be used to apply a custom condition. |
| 5. Languages - Reference field only |
|
Heroes have some unique additional features such as: |
| 6. Hero Tokens - An editable field to indicate the number of Hero Tokens the party has. This is synced across players so one being ‘spent’ will decrease the value for all. |
| 7. Heroic Resource Count - This will automatically update during combat as Heroic Resources are earned and spent. This number can be clicked on and edited manually if desired. |
| 8. Surges - This will automatically update during combat as Surges are allocated and spent. This number can be clicked on and edited manually if desired. |
| 9. Victories - An editable field to indicate the number of Victories a character has. This is unique to each character and will affect the calculation of Heroic Resources & Malice at the start of combat. |
| 10. Recoveries - This indicates the number of Recoveries the character has remaining. You can click this button to spend a recovery which will heal you equal to your Recovery Value. Hovering will show a tooltip with your current and total recoveries and your Recovery Value. Right-clicking will allow you to edit the number of Recoveries. |
|
11. Heroic Resource Checklist - This is unique to each class and will automatically be triggered and striked through as the events occur which trigger heroic resource generation. They will reset automatically when applicable. You can right click on these during combat to Trigger them manually if required. Passive abilities, such as the Null's ‘Discipline Mastery’ table, will appear in this section below the checklist. |
| 12. Skills - Reference field only |
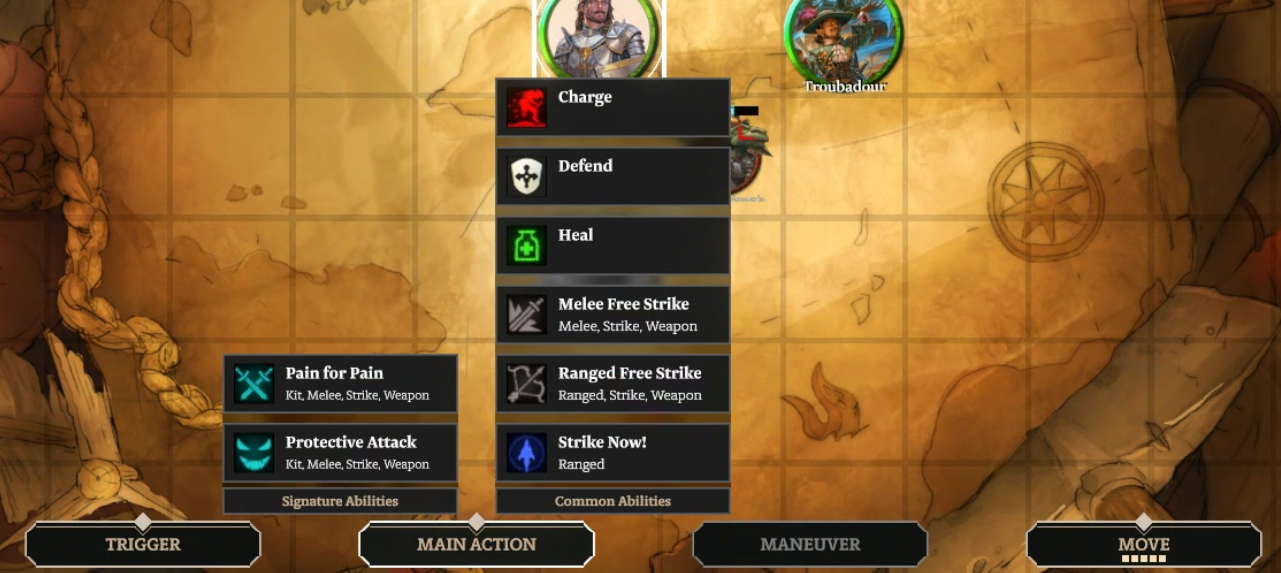
Action Bar & Using Abilities
The Action Bar will appear at the bottom of your screen when your character is selected and is how you activate your various abilities in the Codex. Each button will open what we call a Drawer which contains the relevant abilities within it. Clicking on the button will expand the Drawer, click the ability to activate it. Where the ability requires a target, eligible targets will display a Targeting Ring around them. Clicking on the target will bring up the Power Roll Dialog Box. Some abilities have multiple target options or can have variations. Keep an eye above the action bar where text or buttons will display to indicate this.
The Trigger Drawer is here to remind you of the triggers you have available and give you a way to activate them manually but the Trigger system is automated dependent on the trigger and activated separately. This is covered in the Combat section.
When in combat, the Action Bar buttons will be highlighted and have a Diamond symbol above them while you have all that action remaining and the highlight/diamond will be removed as you use the action type. The Move action has a number of squares underneath it, these represent the number of squares you can move and each square will have the highlight removed as you spend a square of movement.
¶ Power Roll Dialog Box & Making Tests
Power Roll Dialog Box
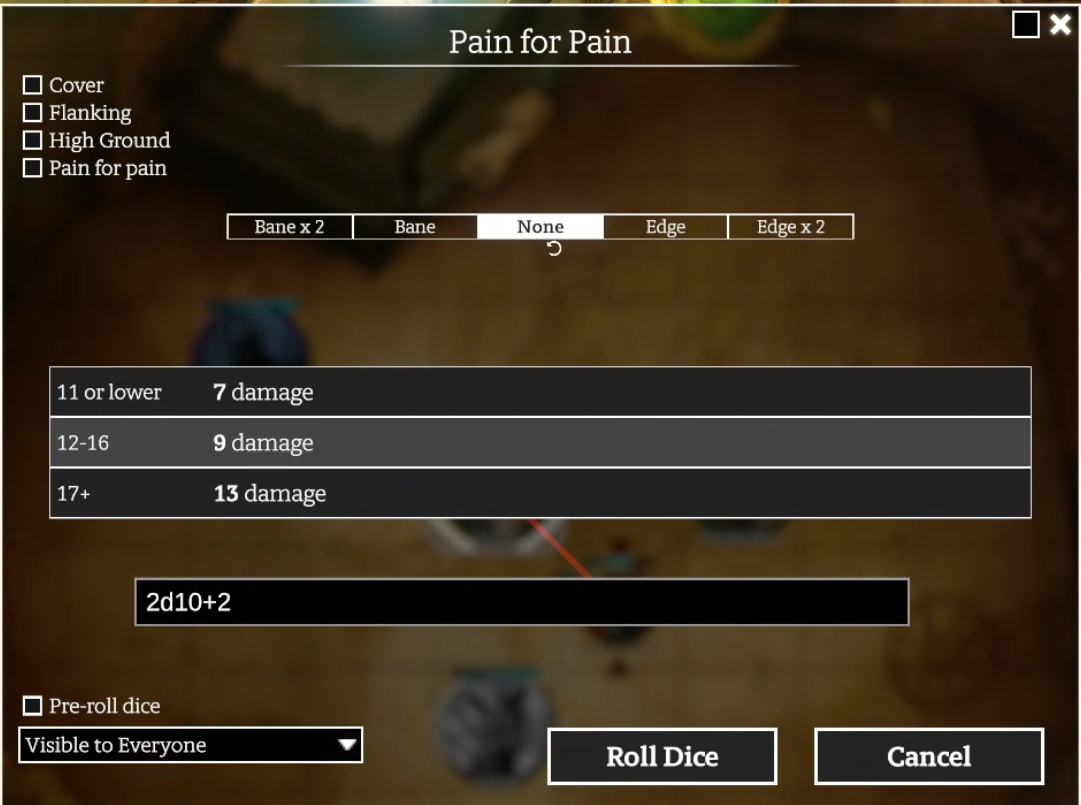
The Power Roll Dialog Box is used throughout the Codex whenever a Power Roll is required in a test or ability. This box is simple but quite powerful. Relevant modifiers to the roll will appear as Checkboxes at the top, these are automatically applied when relevant but at Director discretion these can be manually checked before the roll. You can apply Edges & Banes manually.
When an ability affects multiple targets, the tokens affected by the ability will appear above the Edges/Banes panel. Each one of these can be individually selected to apply Edges/Banes or Power Roll Modifiers individually. In most cases the Codex will handle this automatically.
The Tier Outcome table shows the relevant effects that are applied at each tier, these effects are unique to the abilities or tests that call for these power rolls. Once the dice has been rolled and the Tier selected, you can manually click on another Tier to override the result before you click Accept to process the ability.
The floating Dice beneath the panel can be interacted with to roll the dice manually. You can click and hold and then drag your mouse and release your click to ‘throw’ the dice. This will respond to the speed in which you drag your mouse and impact the dice physics accordingly!
For those that love the clicky-clack of physical dice, the text below the Tier Outcome table can be replaced with a number to skip the digital dice roll and apply the relevant tier. You can also control whether the Dice Roll is Visible to Everyone or Visible to the Director only. Next to the Close button in the top-right, there is a square which you can click to minimise and maximise the dialog box, handy in those situations where you need to survey the battlefield before rolling the dice!
When a character has a trigger which can affect the ability of the power roll, this can be manually selected here and appears above the Roll Dice & Cancel buttons.
Making Test Rolls
Abilities with power rolls and abilities that call for Reactive tests are automated in the Codex when the abilities are implemented. This covers combat but for roleplay, montage, negotiation or exploration scenes, we handle these differently.
There are two ways to make test rolls in the Codex.
- The Player or Director click the relevant Characteristic for the test in the Character Panel. This opens a Power Roll Dialog box where they can click the Checkbox if they are applying a Skill to roll to add the +2. They can also select any Edges or Banes that may apply before rolling the Dice.
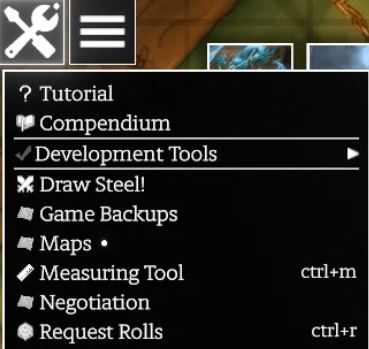
- The Director can press
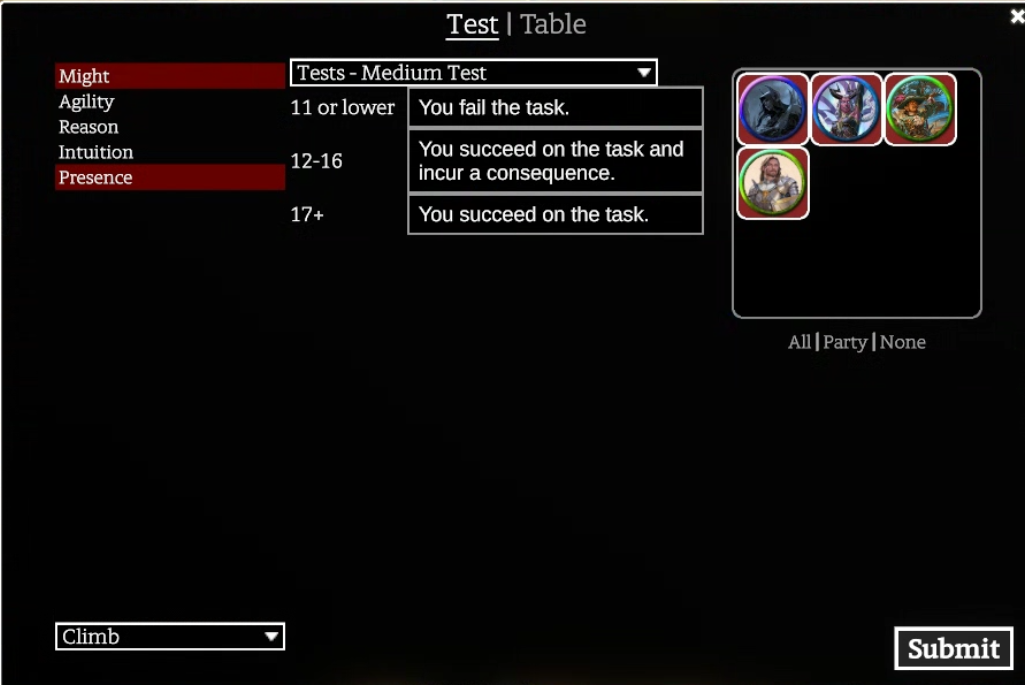
Ctrl + Ror click the Settings icon in the Menu bar and select Request Rolls. This will bring up a Dialog Box where the Director can select a test template, the characteristic the test will use, select the players they would like to make the test and call for a Specific skill in that test. When the Director presses Submit, each player selected to make the test will get a prompt to make a roll. The Director is presented a screen where they can see who has made the roll & the Tier Outcome they received.
 |
 |
¶ Token Movement & Tools
Token Movement
There are two main ways to move a token, you can use the arrow keys on your keyboard or you can click and drag your token to the new location. Clicking and dragging has the additional benefit of providing you with a highlighted box indicating how many squares you have remaining in your movement this turn. For this reason, we recommend the Click and drag option.
By default this box only appears in Combat but the Director can change this in Settings under the Game tab.
To Shift, you can hold down the Shiftkey on your keyboard while moving your token, this will give your token a Shifting animation while moving and will not trigger opportunity attacks from enemies.
Directors can teleport a token to a new location by holding Ctrl as you drag the token. This will move the token directly to the new location instead of pathing through other squares to reach that location.
Abilities or effects that grant a teleport to a creature are handled automatically through the Codex, we leave it up to the Director to manually teleport a Hero or Monster if required.
Elevation Indicator
In the top right of your token, there will be an icon and number to indicate your current elevation in squares on the map. This only appears when the token is at greater or less than 0 squares high. The icon changes depending on what movement the token is using. E.g. Flying will have a wing icon, walking will have a boot icon.
Flying
If your hero or monster has a fly speed, you can use the key commands Alt + Up Arrow or Alt + Down Arrow with your token selected to increase the elevation of your token. There will be a hovering animation on the token to indicate it is flying.
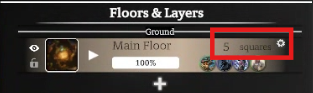
The height you can fly on the map is determined by the Ceiling Height the Director has set on the map layer your token is on. The default value of Ceiling Height is 1 square, for flying to work this must be set to more than 1 square. This is the first thing to check if your token has a Flying speed value and the above key commands are not working for you.
Burrowing
This is not yet implemented in the Codex.
Climbing
This is not yet implemented in the Codex.
Forced Movement
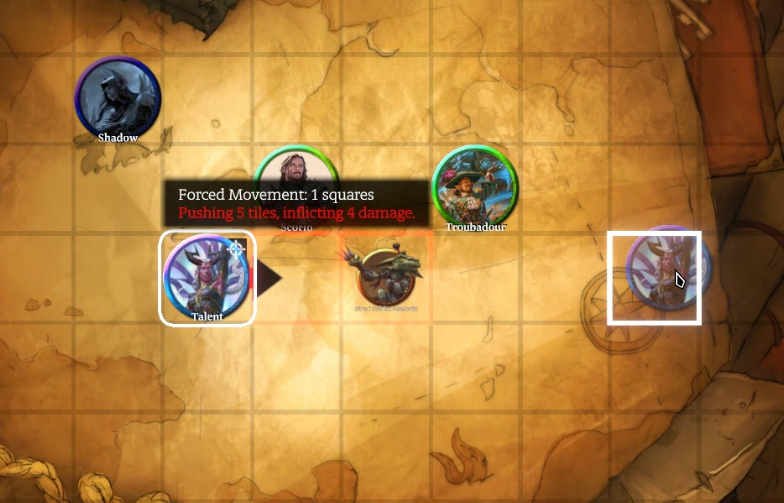
Most abilities and effects that have forced movement in the Codex will handle this automatically. For abilities that haven’t been implemented yet or if the Director wants to trigger forced movement manually, this can be done by holding Alt while clicking and dragging the token to a new location. While holding Alt, you can use the mouse scroll to increase and decrease elevation of the Forced Movement, this is how we handle Vertical Forced Movement.
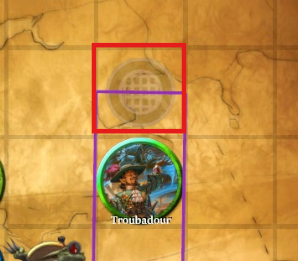
The Codex supports Forced Movement damage by moving creatures into other creatures or into walls and applying damage based on the number of squares remaining in the instance of Forced Movement. To do this, you need to drag the token past the obstacle the number of squares remaining in the movement. An example of this is in the image below.
Tools
Measurement Tool
The measurement tool can be accessed by the shortcut Ctrl + M or by clicking on the Ruler icon in the Game Menu bar.

The measurement tool lets you change shape, line width, how the shape snaps to the grid, display to others and the Director can choose for their templates to persist on the map.
The Shape options are:
- Ruler
- Circle
- Square
- Cone
- Line
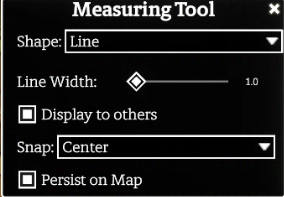
The Snap options are:
- Centre (of the square)
- Corner (of the square)
- None (no snapping)
If the Persist on Map option is set, the measurement template will be turned into an Object and remain on the map. This can be deleted by clicking on the Template Object icon and pressing Delete on your keyboard.
Whiteboard
The Whiteboard Panel can be accessed via the Menu in the Game Menu bar. Each user that wants to use the Whiteboard will need to enable the panel. The panel will be added to the user’s UI. Once this has added, users can draw directly onto the Canvas. To disable drawing on the canvas, they will need to either right-click on the panel and select Close or go back to the Menu and click again on Whiteboard to disable the panel.

This is a fairly basic tool, the user can change their colour, the stroke width and there are controls to Clear All or Clear Players. Clear All removes all whiteboard marks on the canvas, Clear Players will retain any Director whiteboard marks but clear the Players whiteboard marks.
¶ Common Shortcuts
Camera
| Description | Keybind |
|---|---|
| Drag Camera | Middle mouse-click |
| Pan Camera | W, A, S, D |
| Zoom In/Out | =, - |
Gameplay
| Description | Keybind |
|---|---|
| Character Sheet | C |
| Emotes | M |
| Flip Token | F |
| Fly Token Up/Down | Alt + Up Arrow , Alt + Down Arrow |
| Freeze Game (Director only) | Space |
| Inventory | I |
| Loadout 0-3 | Ctrl + 0-3 |
| Move Token | Arrow Keys |
| Move Token Diagonals | End , Page Down , Home , Page Up |
| Next Character | Tab |
| Next Token Variation | . |
| Previous Token Variation | , |
| Ping | Long Click |
| Ping & Summon Camera | Shift + Long Click |
Editor
| Description | Keybind |
|---|---|
| Copy | Ctrl + C |
| Cut | Ctrl + X |
| Paste | Ctrl + V |
| Undo | Ctrl + Z |
| Redo | Ctrl + Y |
| Increase/Decrease Brush Size | [, ] |
| Move Objects to Bottom | Ctrl + ] |
| Move Objects to Top | Ctrl + [ |
| Next/Previous Object in Palette | Alt + Scroll Up/Scroll Down |
| Toggle Visibility (Tokens/Objects) | Ctrl + I |
Actions
| Description | Keybind |
|---|---|
| Measuring Tool | Ctrl + M |
| Request Rolls (Director Only) | Ctrl + R |
System
| Description | Keybind |
|---|---|
| Context Menu | Right Click |
| Debug Console | ` |
| Hide HUD | F9 |
| Refresh Game | F5 |
| Refresh Game + Connections | Ctrl + F5 |
| Increase/Decrease Value (Certain UI Elements Only) | Middle Wheel Scroll Up/Down while hovering over value. Works on Stamina, Heroic Resource, Surges, etc. |
¶ Chat & Action Log
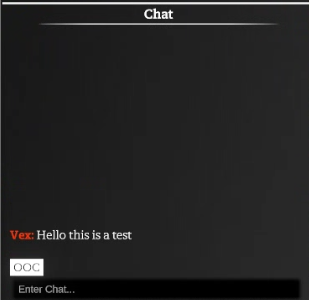
Chat
The Chat panel appears on the left hand side of the HUD and accepts free text as well as commands. Type in the box and press enter to send a message to the chat. You can chat as OOC which stands for ‘Out of Character’, this will present as being sent from the user.
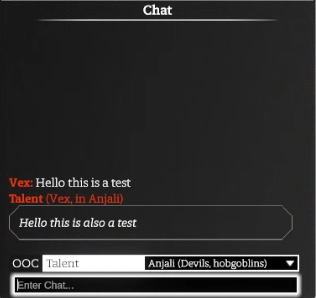
If you select your Character Name (Talent in the image above), you can choose one of the languages your character knows and send a message ‘In Character’. This will display in plain text to those characters that share the same language and will appear as a different font that cannot be read to those that don’t share the same language.
You can right click on a message in the chat window to delete it. The Director can right click anywhere in the chat history and select Clear to reset both the Chat and Action Log. The Director can also right click on a message to Hide or Reveal it to Players.
Action Log
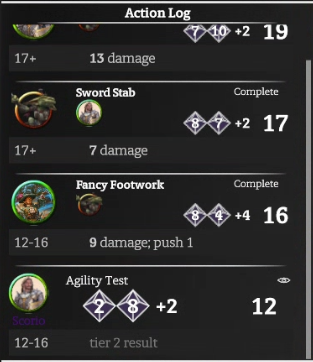
The Action Log sits above the Chat Panel and as the name suggests, is a log of all actions performed. This is where the results for Abilities & Tests will be stored and is an easy way to refer to what has happened during play. It will show the Token that rolled, if a target was applicable it will show that target, the dice results and any bonuses as well as the Tier Outcome achieved and what the effect was.
Hovering over the Dice Roll results will show a Tooltip with the Dice rolled and if Edges/Banes were applied.
The Director can right click in the Action Log to Clear it (this will also clear the Chat log) or to Delete or Hide/Reveal messages in the Action Log.
¶ Settings
The Settings menu can be reached from the Menu bar by clicking on the Cog icon.

All users will see General, Graphics, Audio, Game, Shortcuts and Account settings tabs. There are also some individual settings within these tabs which are only visible to the Game Owner (such as Anthem duration in Audio settings)
Please see below for basic information on the Settings available.
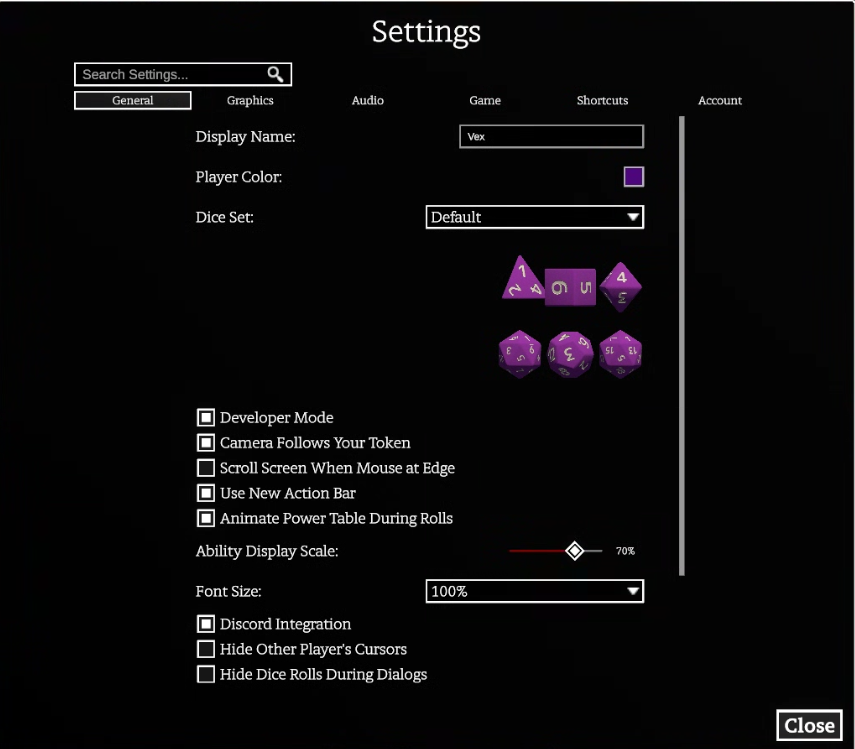
General
|
Setting |
Description |
|---|---|
| Display Name | The name your user will show in the Codex |
| Player Colour | The colour of your name, your dice and your cursor as it appears on other computers |
| Developer Mode | Enables debugging and other useful features for modders. |
| Camera Follows Your Token | Centers the camera on your token when it moves. |
| Scroll Screen When Mouse at Edge | Allows moving the camera by dragging the mouse at the edge of the camera bounds. |
| Animate Power Table During Rolls | Disabling this will turn off the animation cycling through tier results as the dice are rolling. |
| Font Size | Increase or Decrease the Font Scaling |
Graphics
The Codex has all graphics settings tuned to maximum by default. If your machine is not powerful, you may wish to lower the performance settings for increased performance. Please see our system requirements for the minimum recommended specs.
Low Performance Settings
The image below shows what we recommend for lower spec machines.
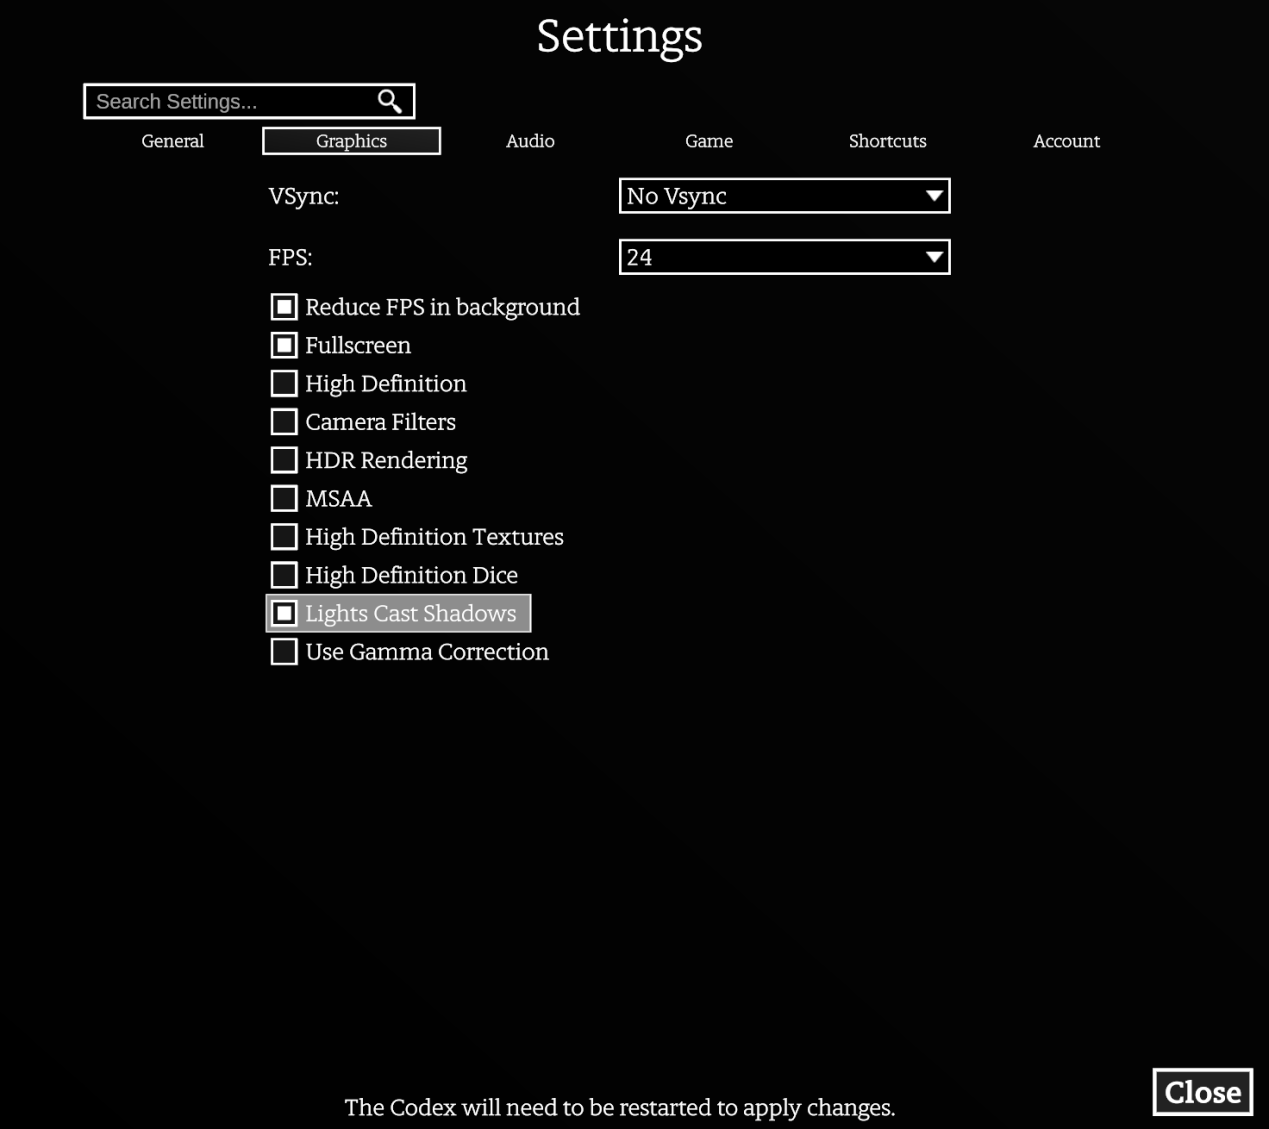
You can also turn off Lights Cast Shadows which will make a slight difference, but it does cause maps to look much worse so we recommend avoiding this unless you absolutely have to.
If your computer is running the settings below with no issues, you can also try turning on High Definition Textures which will greatly improve the visual quality of the Codex.
Audio
|
Setting |
Description |
|---|---|
| Master Volume | Adjust volume across all sounds |
| Footsteps Volume | Adjust volume of footsteps |
| Dice volume | Adjust volume of dice |
| UI volume | Adjust volume of UI elements |
| Gameplay Volume | Adjust volume of gameplay elements |
| Anthem Duration (Director Only) | Adjust the duration of a token’s Anthem that will play on their turn |
Game
Many of the Game settings can only be changed by the Game Owner
|
Setting |
Description |
|---|---|
| Auto-roll all dice | Dice will roll automatically |
| Dice Speed | Control the speed of the dice roll |
| Show vision of selected tokens | When enabled, you will see a vision overlay when you select a token |
| Hide saving throws for monsters from players | Saving throws for monsters will not show for players |
| Instantly roll monster saving throws | Monster saving throws will be rolled instantly and not prompt you to roll |
| Max. Character Movement Duration | Set the maximum duration of a player’s move, regardless of how far the move is |
| Character Movement Speed | Adjust how fast character’s move |
| Constrain tokens to grid | Adjusts whether tokens are constrained to grid always or only in combat |
| Map Memory Colour | Adjust the colour overlay for Map Memory |
| Players can control initiative | Allows players to control initiative |
| Friendly Fire | Abilities can damage friends |
| Stamina Bars for enemies shown to players | Shows the stamina bar of monsters to the players, this does not show values |
| Stamina Bars shown to party | Stamina bars of party members visible to all |
| Stamina Bars shown to controlling player | When enabled, the controlling player of a token can see its Stamina Bar |
| Stamina Bars shown to Director | When enabled the Director will see Stamina Bars |
| Stamina Bars hidden when not in combat | Changes whether Stamina Bars are only visible in combat or always |
| Default Roll Visibility | Adjusts the default roll visibility |
| Monster Names Private | When enabled, players will not see Monster Names |
| Parallax | Control the level of Parallax in your game and how pronounced it is. |
| Player Mouse Position Shared | When enabled, player's mouse positions will be shared and visible to all players |
| Director Mouse Position Shared | When enabled, player's will see the Director's mouse position. |
Shortcuts
This tab is where you can see, add or change the keybinds for shortcuts in the Codex.
Account
This tab shows you the account you are logged in as and how much of your bandwidth upload quota is remaining for the month.